Multi-Factor Sign-In
Multi-factor sign-in is available from eConnect 11.0.10. On an earlier server your profile has no Multi-factor sign-in section, and nothing on this page applies.
Multi-factor sign-in adds a second step to signing in: after your password, eConnect asks for a six-digit code. Somebody who learns your password still cannot sign in as you without that code as well — which matters most for accounts that can see or change a lot.
There are two ways to get the code, and you can have both:
| Method | Where the code comes from | How you turn it on |
|---|---|---|
| Authenticator app | An app on your phone shows a new code every thirty seconds | Enable |
| Email codes | eConnect emails you a code when you ask for one | Use email codes instead, or Add email codes |
Either one comes with ten recovery codes for the day you cannot get a code. Once one of them is on, you can also add a passkey, which finishes signing in to eConnect in a browser with your fingerprint, face, PIN or a security key instead of a typed code.
It is off until you turn it on — unless your organisation requires it for your user group, in which case you are told, and given time to set it up (see When your organisation requires it). What signing in looks like afterwards is in Signing In.
Before you start
You need:
- Your current password.
- For the authenticator app, an authenticator app on your phone. Any standard one works — Microsoft Authenticator, Google Authenticator, Authy and others.
- For email codes, an email address in your profile, and an eConnect server that can send email. Where your administrator has not set up email for eConnect, email codes are not offered.
- Somewhere safe to keep ten recovery codes — a password manager, or a printed copy kept somewhere secure. Not only on the phone: codes kept on the phone are lost with it.
Set it up in the desktop client or in a browser. The older Windows client has no setting for it, although it can still sign you in afterwards — see The older Windows client.
Turning it on with an authenticator app
- Open the account menu in the title bar and choose Profile. Under Security, Multi-factor sign-in shows Off. Choose Enable.
- Enter your Current password and choose Continue. You are asked again even though you are signed in, so that somebody at a workstation you left unlocked cannot attach their own phone to your account.
- Scan the QR code with your authenticator app. If the app cannot scan it, choose the option in the app to enter a key instead, and type the key shown under Can't scan? Enter this key instead — Copy puts it on the clipboard. The app lists the account as eConnect - your user group's name with your user name, so that if you have accounts at more than one site you can tell their entries apart.
- Enter the six-digit code the app is showing in Authentication code, and choose Verify.
- Save your recovery codes, tick I have saved these codes, and choose Done.
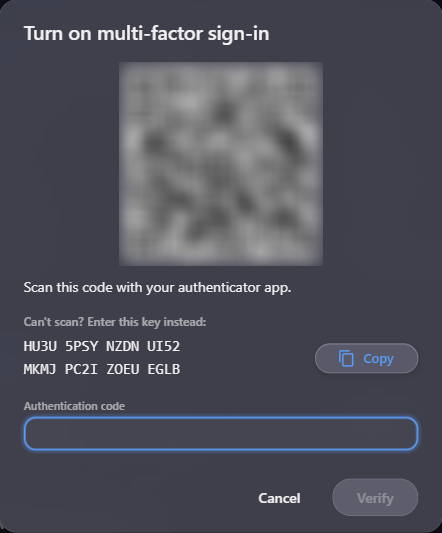
The Security section then shows Enabled, a line for each method that is on, and how many recovery codes you have left. From your next sign-in, eConnect asks for a code after your password.
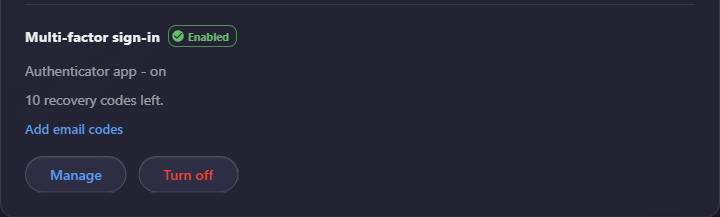
On a server where passkeys can be used, a Passkeys section follows Manage and Turn off — see Passkeys.
Finish within ten minutes. A setup left longer than that, or given five wrong codes, is discarded: the next code you enter brings This setup has expired. Start again., and you begin again from your password, with a new QR code. Delete the entry the abandoned attempt added to your authenticator app, so you never read a code from the wrong one.
If a code is refused with That code is not correct., wait for the next one and try that. If every code is refused, the time on your phone or on the server is wrong — codes are worked out from the current time, so both clocks have to agree. Set your phone to take its time automatically, and tell your administrator if that does not fix it.
Using email codes
With email codes, eConnect emails a six-digit code to the address in your profile whenever you sign in. There is nothing to install, but the code is only as safe as your mailbox: anybody who can read your email can read the code. An authenticator app is the stronger choice, and you can have both.
Turning them on
- In the Security section of your profile, choose Use email codes instead (beside Enable) — or, if the authenticator app is already on, Add email codes. Both open Turn on email codes.
- Prove it is you. With no method on yet, enter your Current password. With the authenticator app on, enter a current code from it; a recovery code will not do here. Choose Send code.
- eConnect emails Your eConnect confirmation code to the address in your profile. The dialog says where it went, with most of the address hidden. Type the code in Code from the email and choose Verify.
- If email codes are your first method, your ten recovery codes are shown next, exactly as for the app. If the authenticator app was already on, you keep the recovery codes you have and no new ones are shown.
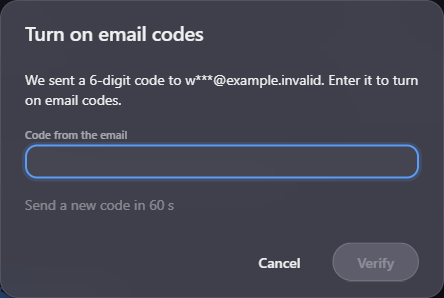
Send a new code becomes available sixty seconds after each code. As with the app, the setup lasts ten minutes and allows five wrong codes. Because nobody has yet proved that the address in your profile is yours, eConnect sends setup codes to it at most once a minute, three times an hour and five times a day; beyond that the dialog carries on as if a code had been sent, but none is. If nothing arrives, check the address in your profile and try again later.
What you might see instead:
| Message | What it means |
|---|---|
| Add an email address to your profile before turning on email codes. | Your profile has no usable email address |
| Email codes are not available on this server. | eConnect cannot send email; ask your administrator |
| Your sign-in methods changed while this set-up was open. Start again to continue. | Another method was turned on — in another window, say — while this setup was open. Choose Start again |
Signing in with them
At sign-in, if email codes are your only method, eConnect emails you a code as soon as it asks for one — unless you can use a passkey there, when it waits for you to choose Email me a code. With the authenticator app as well, the prompt offers Email me a code instead. Each code works once, for ten minutes. The details are in Signing In.
In the older Windows client, an account with email codes only signs in in two steps — see The older Windows client.
When your email address changes
Changing the email address in your profile — or an administrator changing it for you — turns your email codes off, because the codes would otherwise go to an address nobody has proved. eConnect emails The email address on your eConnect account was changed to the old address, so that you hear about a change you did not make. Saving the same address with different capitals or spaces changes nothing.
Turn email codes on again for the new address. Until you do:
- With the authenticator app as well, you sign in with the app, as usual.
- With email codes as your only method, you sign in next time as if you had never set up multi-factor sign-in, and any passkeys you had are removed with them — a passkey never stands alone. The notice email says so.
If your account signs in through your organisation's directory, eConnect normally copies your email address from the directory each time you sign in. While email codes are on it does not, so your codes keep going to the address eConnect already has. To move to the directory's new address, change the address in eConnect yourself — which turns email codes off — and turn them on again.
Having both methods
With both on, the Security section shows a line for each — Authenticator app - on, and Email codes - on with your address partly hidden — and each line has Remove. When you sign in, the prompt opens for the app and offers Email me a code instead below.
Remove asks Remove the authenticator app? or Turn off email codes?, and says You will sign in with your other method. Confirm with a current code from your authenticator app, or choose Use a recovery code instead, then choose Remove. While both are on, six digits typed here are always checked against the app.
Two things cannot be removed:
- Your only method. You are told This is your only sign-in method. Turn multi-factor sign-in off instead.
- The method your organisation needs. Where your user group requires multi-factor sign-in and does not allow the other method, you are told Your organisation requires this method. Add another allowed method first.
Removing a method forgets your remembered devices.
Adding the authenticator app after email codes
If you started with email codes, choose Add authenticator app. Instead of your password, the dialog asks for an emailed code: choose Email me a code, type the code from the email and choose Continue, then scan and verify as in Turning it on with an authenticator app. You are given ten new recovery codes, which replace your old ones; the codes step says This replaces your previous codes.
Recovery codes
At the end of setup eConnect shows ten recovery codes. Each one works once, in place of a code, for the day your phone is lost, broken, flat or at home — or, with email codes only, the day the email does not come.
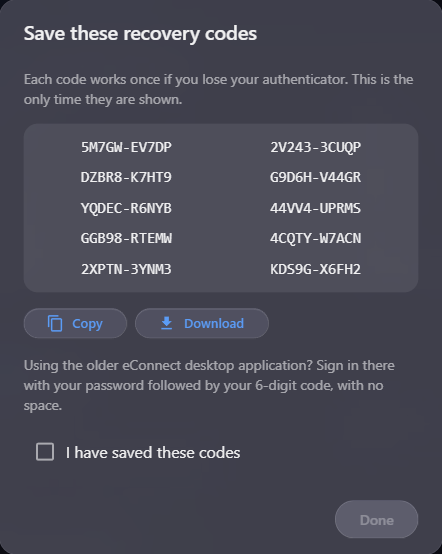
They are shown this once and never again, which is why Done stays unavailable until you tick
I have saved these codes, and why the dialog cannot be closed any other way. Copy copies all
ten; Download saves them as a text file, eConnect-recovery-codes.txt.
When you type one, capitals and the dash do not matter. The Security section counts how many you have left, so you can see when it is time for a new set.
Generating new recovery codes
Choose Manage in the Security section, then Generate new recovery codes, and enter a current six-digit code from your authenticator app — or, if email codes are your only method, choose Email me a code and type the code from the email. A recovery code will not do here: the codes being replaced cannot vouch for their own replacement.
The new set is shown once, exactly as at setup, and says This replaces your previous codes. The old ones stop working at once. Do this when you have used several, or if you think somebody else may have seen them.
Emailed codes for changes in your profile
If email codes are your only method, every change in your profile that needs proof — new recovery codes, turning it off, adding the authenticator app, adding or removing a passkey — works the same way: choose Email me a code, and type the code from Your eConnect confirmation code. A new code can be sent only once a minute. Within that minute, any of these dialogs shows the field for the code already sent, and Send a new code counts down before it can be used.
Remembered devices
Where your user group allows it, the code prompt offers Remember this device for 30 days — the number of days is your organisation's setting. Tick it before you enter your code, and the next time you sign in on that browser or that desktop client, your password is enough: the code is skipped until the days are up. Using the device does not extend them.
- In a browser, it works only over a secure (
https) connection. Through the Service Bridge the box is still offered, but the browser is never actually remembered. - In the desktop client, the device is kept in Windows' secure storage, separately for each server and user name. People who share one Windows sign-in share it too. Where that storage is not working, the box is not offered.
- The older Windows client never skips the code.
While multi-factor sign-in is on, the Security section lists them under Remembered devices — each with its browser and system, and when it was Added and Expires — with Forget all devices. That asks Forget all remembered devices?; choose Forget all, and each of them asks for a code at its next sign-in. Do it whenever a device is lost or no longer yours.
Several things forget them for you: any change of your password in eConnect (including one made with a reset link), turning multi-factor sign-in off or on again, generating new recovery codes, removing one of two methods, adding or removing a passkey, changing your email address while email codes are on, an administrator resetting your multi-factor sign-in, and your organisation turning remembering off. A password changed in your organisation's directory does not.
A device remembered after an emailed code, or after a passkey, skips the code only while that method would still be accepted. If your organisation stops allowing it, you are asked for a code again; the device works again if the method is allowed again within its days.
When your organisation requires it
Your administrator can require multi-factor sign-in for everybody in your user group, and give people a number of days — the grace period — to set it up.
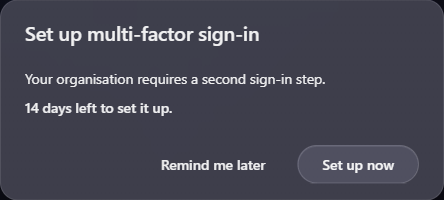
During the grace period, you sign in as before. After signing in, Set up multi-factor sign-in tells you Your organisation requires a second sign-in step. and how long you have, such as 14 days left to set it up. In the last day it gives the time instead, such as Last day - required from 3:00 PM today. The countdown follows the server's clock, not your computer's. Set up now opens the setup in your profile; Remind me later closes the message until your next sign-in. Your profile says Required by your organisation., with the same countdown.
When the grace period ends, if you have not set it up you are signed out within a few minutes, wherever you are signed in. At your next sign-in, after your password, eConnect shows Set up multi-factor sign-in to continue: scan the QR code, enter a code and save your recovery codes, without typing your password again, and Done signs you in. Where your organisation allows email codes, the server can send email and your profile has an email address, No authenticator app? Use email codes instead under the key lets you set those up instead — Send code, then the code from the email and Verify. Cancel returns you to the sign-in screen. The setup lasts ten minutes and five codes; after that the sign-in screen shows This setup has expired. Sign in again.
While it is required, Turn off is not offered.
If your group allows only some methods
Your organisation can decide which methods its members may use. The authenticator app is always allowed; email codes and passkeys can each be switched off.
- If you use only email codes and your group does not allow them, you can still sign in with an emailed code during the grace period, and you are reminded to Add an authenticator app — Your organisation requires an authenticator app. — with the same countdown; your profile says the same above Add authenticator app. After the grace period, a correct emailed code takes you straight into setting up the app — Your organisation requires an authenticator app. Set it up now to finish signing in. — and its new recovery codes replace your old ones.
- If you have the authenticator app and your group does not allow email codes, email codes are not offered when you sign in, on any client.
- If your group does not allow passkeys, Use a passkey is not offered, and you sign in with your code.
- A passkey never counts as the method your group requires, however many you have.
Switching user group
If you can switch between user groups, switching into one that requires multi-factor sign-in needs a sign-in that used a second step that group allows. Otherwise the switch is refused with This group requires multi-factor sign-in. Turn it on in your profile, then sign in again. Set it up if you have not, then sign out and sign in again with a method that group allows.
Turning it off
Choose Turn off. Turn off multi-factor sign-in? warns Your account will be protected by your password only. Enter a current code from your authenticator app — or choose Use a recovery code instead and enter one of those. If email codes are your only method, choose Email me a code and type the code from the email.
Turning it off removes every method, your passkeys, your recovery codes and your remembered devices, all at once. Turning it on again later starts from the beginning, with a new QR code and a new set of recovery codes. Delete the old eConnect entry from your authenticator app when you do.
Turn off is not offered while your organisation requires multi-factor sign-in; the section says Required by your organisation. instead.
Moving to a new phone
There is no "move" step, so you swap the old phone for the new one:
- With both methods on: remove the authenticator app with a code from the old phone, or with a recovery code, then add it again with the new phone.
- With the old phone still working: turn multi-factor sign-in off with a code from the old phone, then turn it on with the new one.
- Without the old phone: sign in with a recovery code, turn it off with another recovery code, then turn it on with the new phone. That takes two unused codes.
If your organisation requires multi-factor sign-in, Turn off is not offered. Where your group allows email codes, add them first, remove the app, then add the app again with the new phone; otherwise ask your administrator for a reset.
If you lose your phone
Sign in with a recovery code — choose Use a recovery code instead at the code prompt, in the desktop client or a browser. If you have email codes as well, Email me a code instead works too. The older Windows client accepts neither. Once you are in, set up your new phone as above.
If you have lost your phone and your recovery codes, and have no other method, ask your administrator to reset your multi-factor sign-in. Expect to be asked to prove who you are first. The reset removes your methods, passkeys, recovery codes and remembered devices and signs you out everywhere; you then sign in with your password and set it up again — at once, if your organisation requires it.
Emails eConnect sends you
Wherever your eConnect server can send email, and your profile has an email address, eConnect tells you about changes to how you sign in. There is no setting to turn these off.
| When | |
|---|---|
| Your eConnect multi-factor sign-in was changed | An authenticator app was set up or removed, email codes were turned on or off, a passkey was added or removed, multi-factor sign-in was turned off, new recovery codes were created, or an administrator reset it |
| Sign-in codes paused on your eConnect account | Ten wrong codes in a row paused code entry on your account for fifteen minutes |
| The email address on your eConnect account was changed | The address in your profile changed. It goes to the old address |
| Your eConnect password was changed | Your password was changed with a reset link |
Each says what happened and when, in UTC, and what to do if it was not you — for a change, If you did not do this, contact your eConnect administrator now. Take that seriously: a change you did not make means somebody else may know your password. At most three of these are sent for one account in ten minutes, and five in a day; any more are not sent.
Codes come in emails of their own: Your eConnect sign-in code when you sign in, and Your eConnect confirmation code for a change in your profile.
Which accounts can use it
Any account a person signs in to: an account eConnect holds the password for, an account that signs in through your organisation's directory, and a super user. For a directory account, the password setup asks for is your directory password, and the Security section holds only multi-factor sign-in, because your password is managed by the directory.
Service accounts, which belong to integrations rather than people, cannot use it.
Related
- Signing In — the code prompt, a forgotten password, and the older Windows client
- Passkeys — signing in with your fingerprint, face, PIN or a security key, in a browser
- Your Profile — where the Security section lives
- Multi-Factor Sign-In for Administrators — what it means for the people who run your site