VS Code / GitHub Copilot Setup
VS Code with GitHub Copilot is one of the most powerful ways to work with eConnect data. Unlike a chat-only client, VS Code lets Copilot pull live eConnect data and then immediately write it into files in your workspace — generating Markdown reports, HTML dashboards, React pages, or any other structured output, all in one conversation.
- Visual Studio Code installed
- GitHub Copilot extension installed and signed in (requires a Copilot subscription)
Install it from the Extensions panel: search forGitHub CopilotandGitHub Copilot Chat - VS Code version 1.99 or later (MCP support requires this version or newer)
- Your eConnect auth token — see Getting an Auth Token
Step 1: Create a Test Workspace
For your first time trying this out, start with a clean, empty folder rather than an existing project. This keeps things simple and avoids any conflicts with other configurations.
- Create a new empty folder anywhere on your machine (e.g.,
econnect-test) - Open VS Code
- Go to File → Open Folder and select your new folder
You now have a fresh workspace ready to configure.
Step 2: Add the eConnect MCP Server
MCP servers in VS Code are configured via a mcp.json file. The easiest way to add one is through the Command Palette:
- Press
Ctrl+Shift+Pto open the Command Palette - Type
MCPand select MCP: Add Server - Choose HTTP as the server type
- Enter the URL:
https://mcp.econnect.ai/mcp - Give it the name
eConnect - Make it available only to this workspace of globally.
VS Code will create a .vscode/mcp.json file in your workspace automatically. You can also create it manually — it should look like this:
{
  "servers": {
    "eConnect": {
      "type": "http",
      "url": "https://mcp.econnect.ai/mcp"
    }
  }
}
If you want eConnect available in all your workspaces, add the configuration to your user settings.json instead (Ctrl+Shift+P → Open User Settings (JSON)):
{
  "mcp": {
    "servers": {
      "eConnect": {
        "type": "http",
        "url": "https://mcp.econnect.ai/mcp"
      }
    }
  }
}
Step 3: Open Copilot Chat and Confirm the MCP Connection
- Open the Copilot Chat panel with
Ctrl+Alt+Ior click the Copilot icon in the sidebar - At the top of the chat panel, switch the mode to Agent
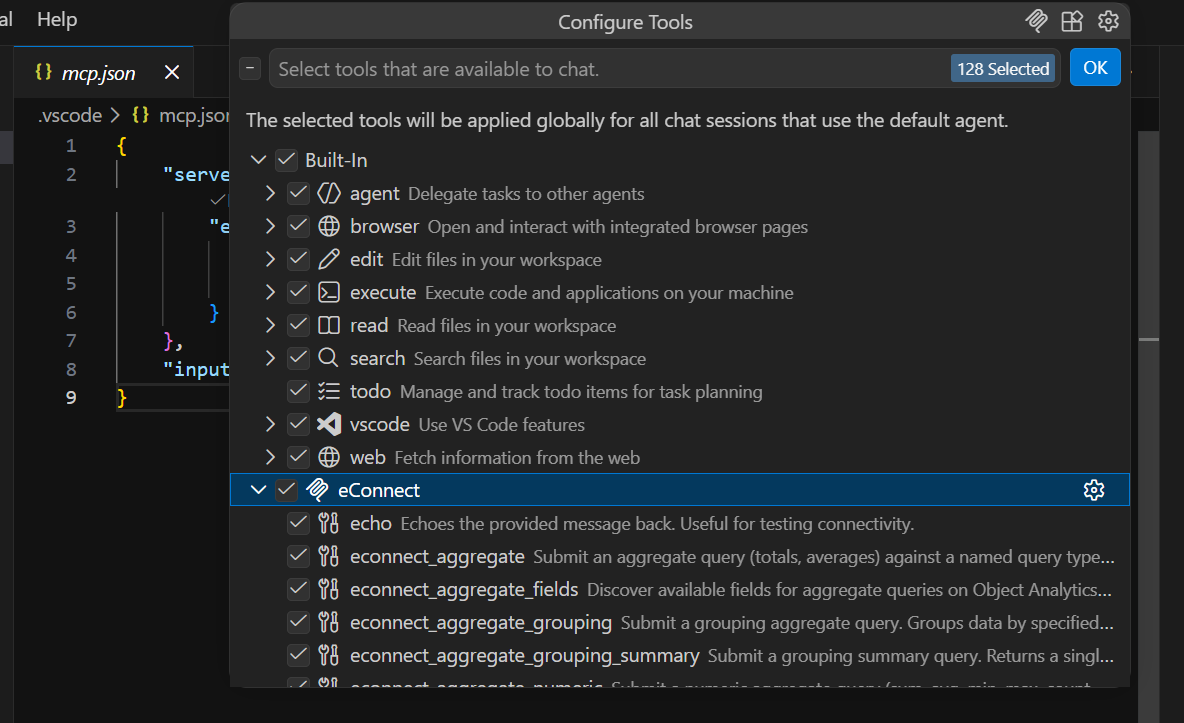
- Click the tools/MCP icon (looks like a plug or wrench) to open the tools list
- Find eConnect in the list and click the Refresh button next to it
If the refresh succeeds and tools are listed (login, face detections, LPR, etc.), VS Code can communicate with the eConnect MCP server. You're ready to go.
If eConnect does not appear in the tools list, verify the JSON syntax in your mcp.json file and restart VS Code.
Step 4: Log In and Start Talking
In the Agent chat, paste your auth token to log in:
Log in to eConnect using this token: [paste your full token here]
Once Copilot confirms the login, just talk to it naturally:
Show me the last 20 face detections
Were there any LPR hotlist hits today?
Get POS exceptions from this morning's shift
How many face detections happened in the last hour?
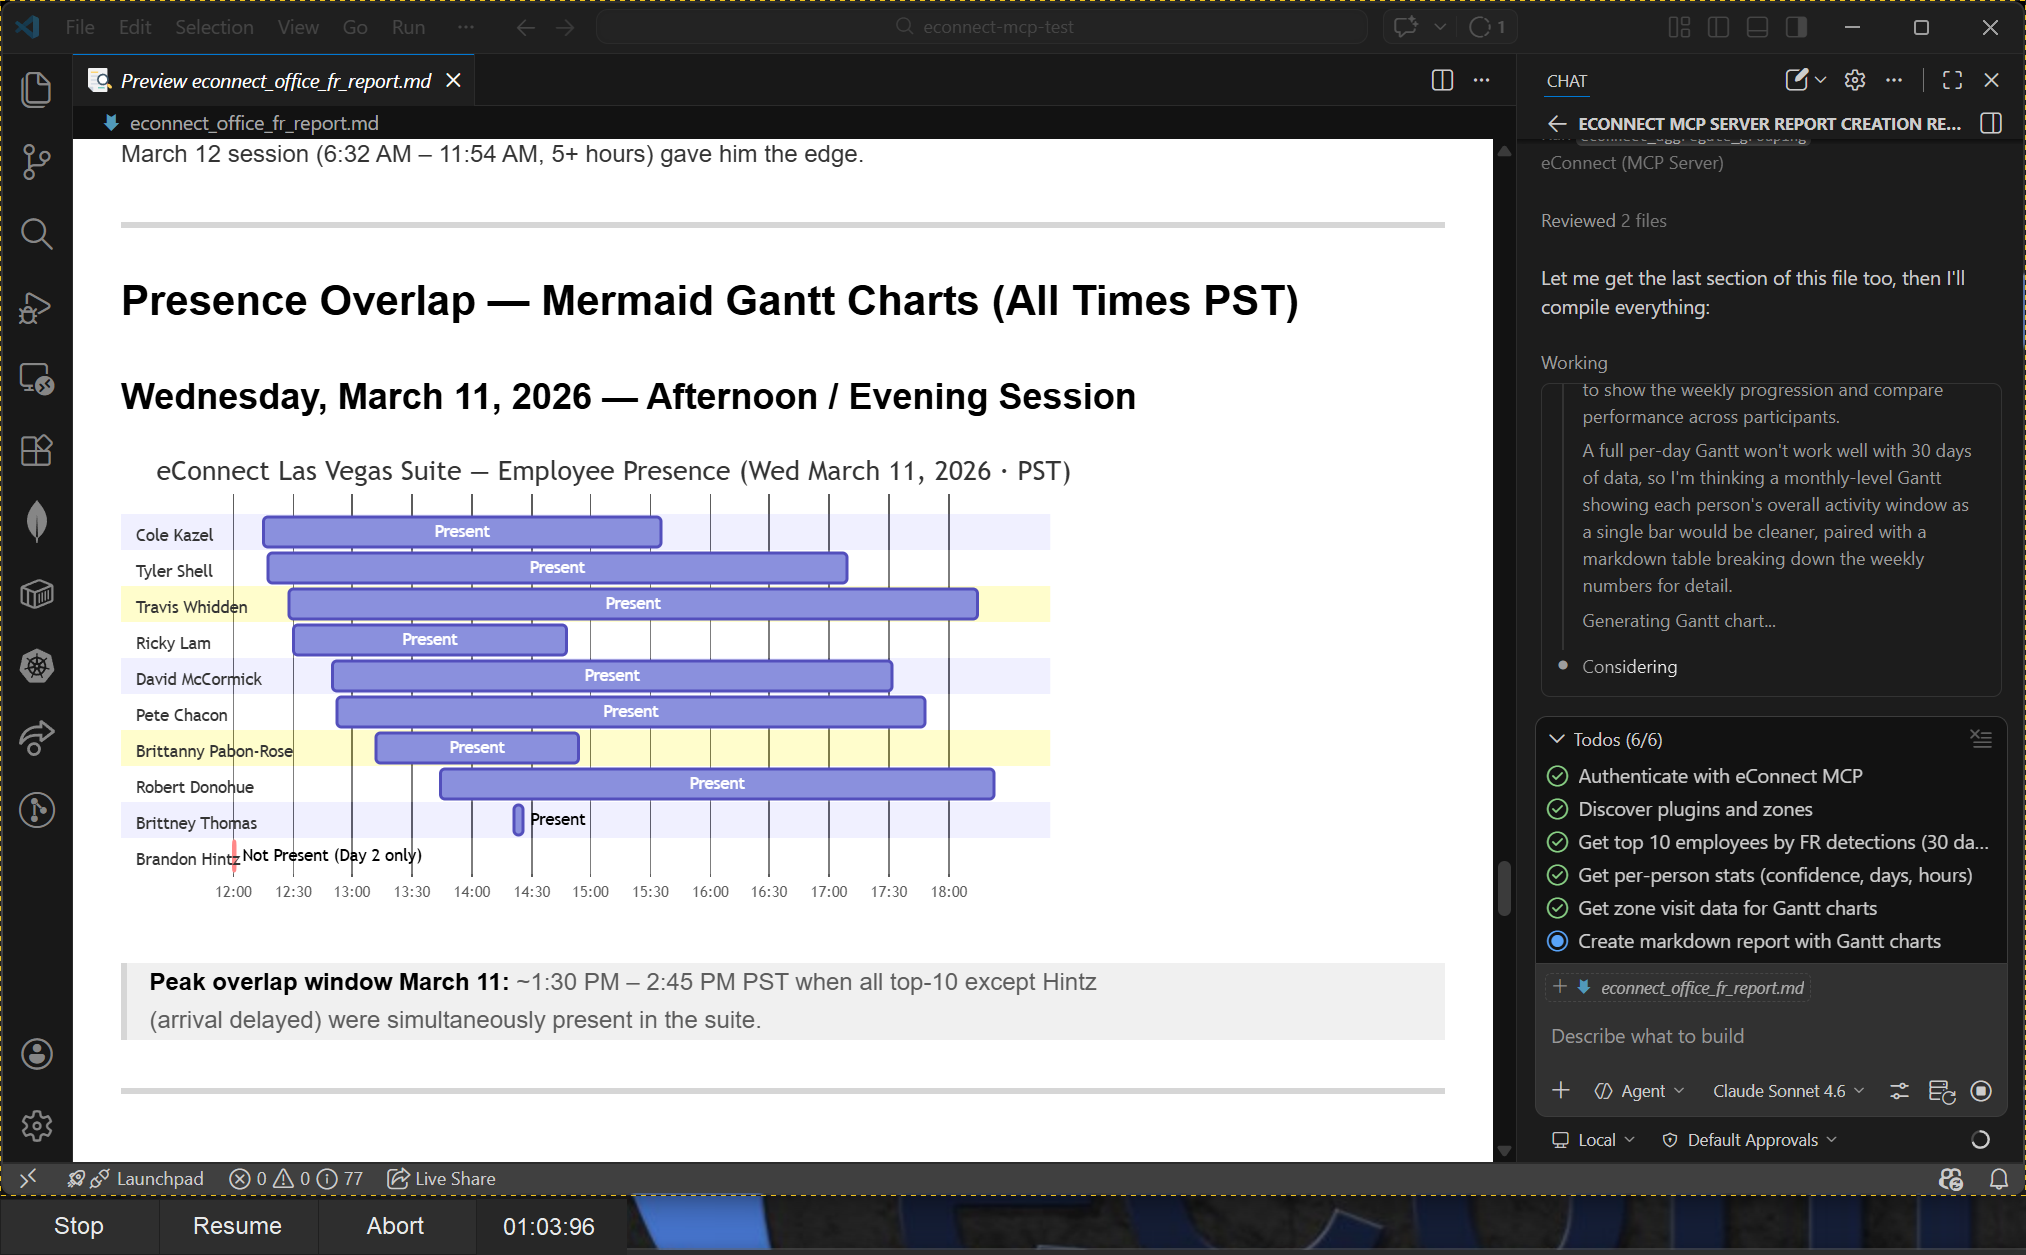
Step 5: Go Further — Generate Real Output
Here is where VS Code really stands out. Because Copilot can read and write files in your workspace, you can ask it to turn eConnect data into actual documents and pages.
Markdown Reports
Get the last 50 face detections and create a Markdown report saved as report.md
Summarize today's POS exceptions and write them to exceptions-report.md
Copilot will query eConnect, format the results into a clean Markdown table, and save the file directly into your workspace.
HTML Reports
Get this week's LPR hotlist hits and create a styled HTML report with a
summary at the top and a sortable table of results. Save it as lpr-report.html
You can open the file with Live Preview or any browser to see a formatted, shareable report.
Interactive React Pages
Pull the last 100 face detections and build a React page with a searchable,
filterable table. Include a count summary at the top and thumbnail images
where available. Save it as DetectionReport.tsx
This is particularly useful for development teams building internal dashboards from live eConnect data.
Step 6: Customize with Copilot Instructions
You can define a copilot-instructions.md file in your workspace to give Copilot persistent rules that apply to every chat session. This is how you tailor the experience to your specific reporting style, branding, or workflow.
Create the file at .github/copilot-instructions.md in your workspace root:
## eConnect Reporting Rules

- Always log in to eConnect at the start of each session using the token below
- Format all reports using these conventions:
  - Use a summary section at the top with key counts
  - Use tables for detection results — include timestamp, camera, and subject name
  - Use red highlighting for hotlist hits or high-priority events
  - Save Markdown reports to the /reports/ folder
  - Save HTML reports to the /output/ folder

## Output Style
- Markdown reports: use H2 headings, bullet summaries, and pipe tables
- HTML reports: clean white background, blue header bar, sortable tables
- React components: use Tailwind CSS, functional components, typed props
With instructions like these in place, Copilot will follow your formatting rules and log in automatically at the start of every session — no need to paste the token each time.
Troubleshooting��
| Issue | Solution |
|---|---|
| eConnect tools not listed in Agent mode | Verify mcp.json syntax (no trailing commas) and restart VS Code |
| MCP tools only show in Agent mode | Switch the chat mode selector from Chat to Agent |
type: "http" not recognized | Ensure VS Code is version 1.99 or later |
| Refresh fails in the tools list | Check that https://mcp.econnect.ai/mcp is reachable from your network |
| Login fails | Regenerate your token from https://mcp.econnect.ai/auth/ |
| Token expired mid-session | Tokens last 7 days by default — generate a new one and paste it in chat |