Claude Desktop Setup
Claude Desktop by Anthropic has native MCP support and is an excellent client for querying eConnect data. Once configured, Claude can browse your face detections, LPR events, POS exceptions, and casino data through natural conversation.
- Claude Desktop installed (download from Anthropic)
- A Claude account (Pro or higher recommended for MCP support)
- Your eConnect auth token — see Getting an Auth Token
Step 1: Add the eConnect MCP Server
Claude Desktop uses a JSON configuration file to register MCP servers. The easiest way to open it is:
- Open Claude Desktop
- Click your name in the lower-left corner
- Click Settings → Developer → Edit Config
This opens the config file in File Explorer (Windows) or Finder (macOS) so you can open it in any text editor.
The file is located at:
- Windows:
%APPDATA%\Claude\claude_desktop_config.json - macOS:
~/Library/Application Support/Claude/claude_desktop_config.json
If it doesn't exist yet, create it.
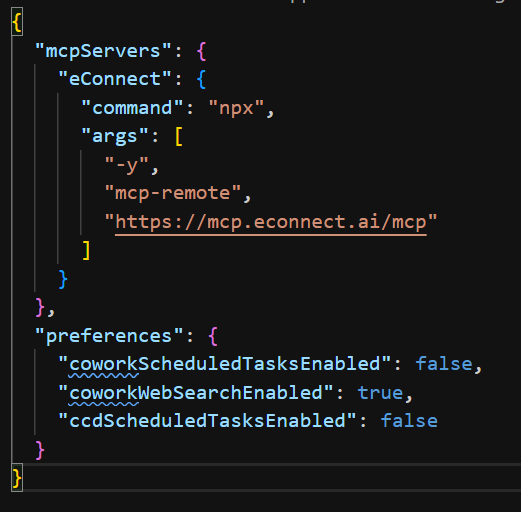
Open the file and add the eConnect server entry. If the file is empty, paste the full block below. If it already contains other MCP servers, add the "eConnect" entry inside the existing "mcpServers" object.
{
  "mcpServers": {
    "eConnect": {
      "command": "npx",
      "args": ["-y", "mcp-remote", "https://mcp.econnect.ai/mcp"]
    }
  }
}
mcp-remote?Claude Desktop communicates with MCP servers over stdio (a local process), not directly over HTTP. The mcp-remote package acts as a lightweight bridge — it runs locally using Claude's built-in Node.js runtime, receives Claude's MCP calls over stdio, and forwards them to the eConnect cloud endpoint. The -y flag installs it automatically on first run.
Save the file, then fully quit (File → Exit) and reopen Claude Desktop — closing the window is not enough.
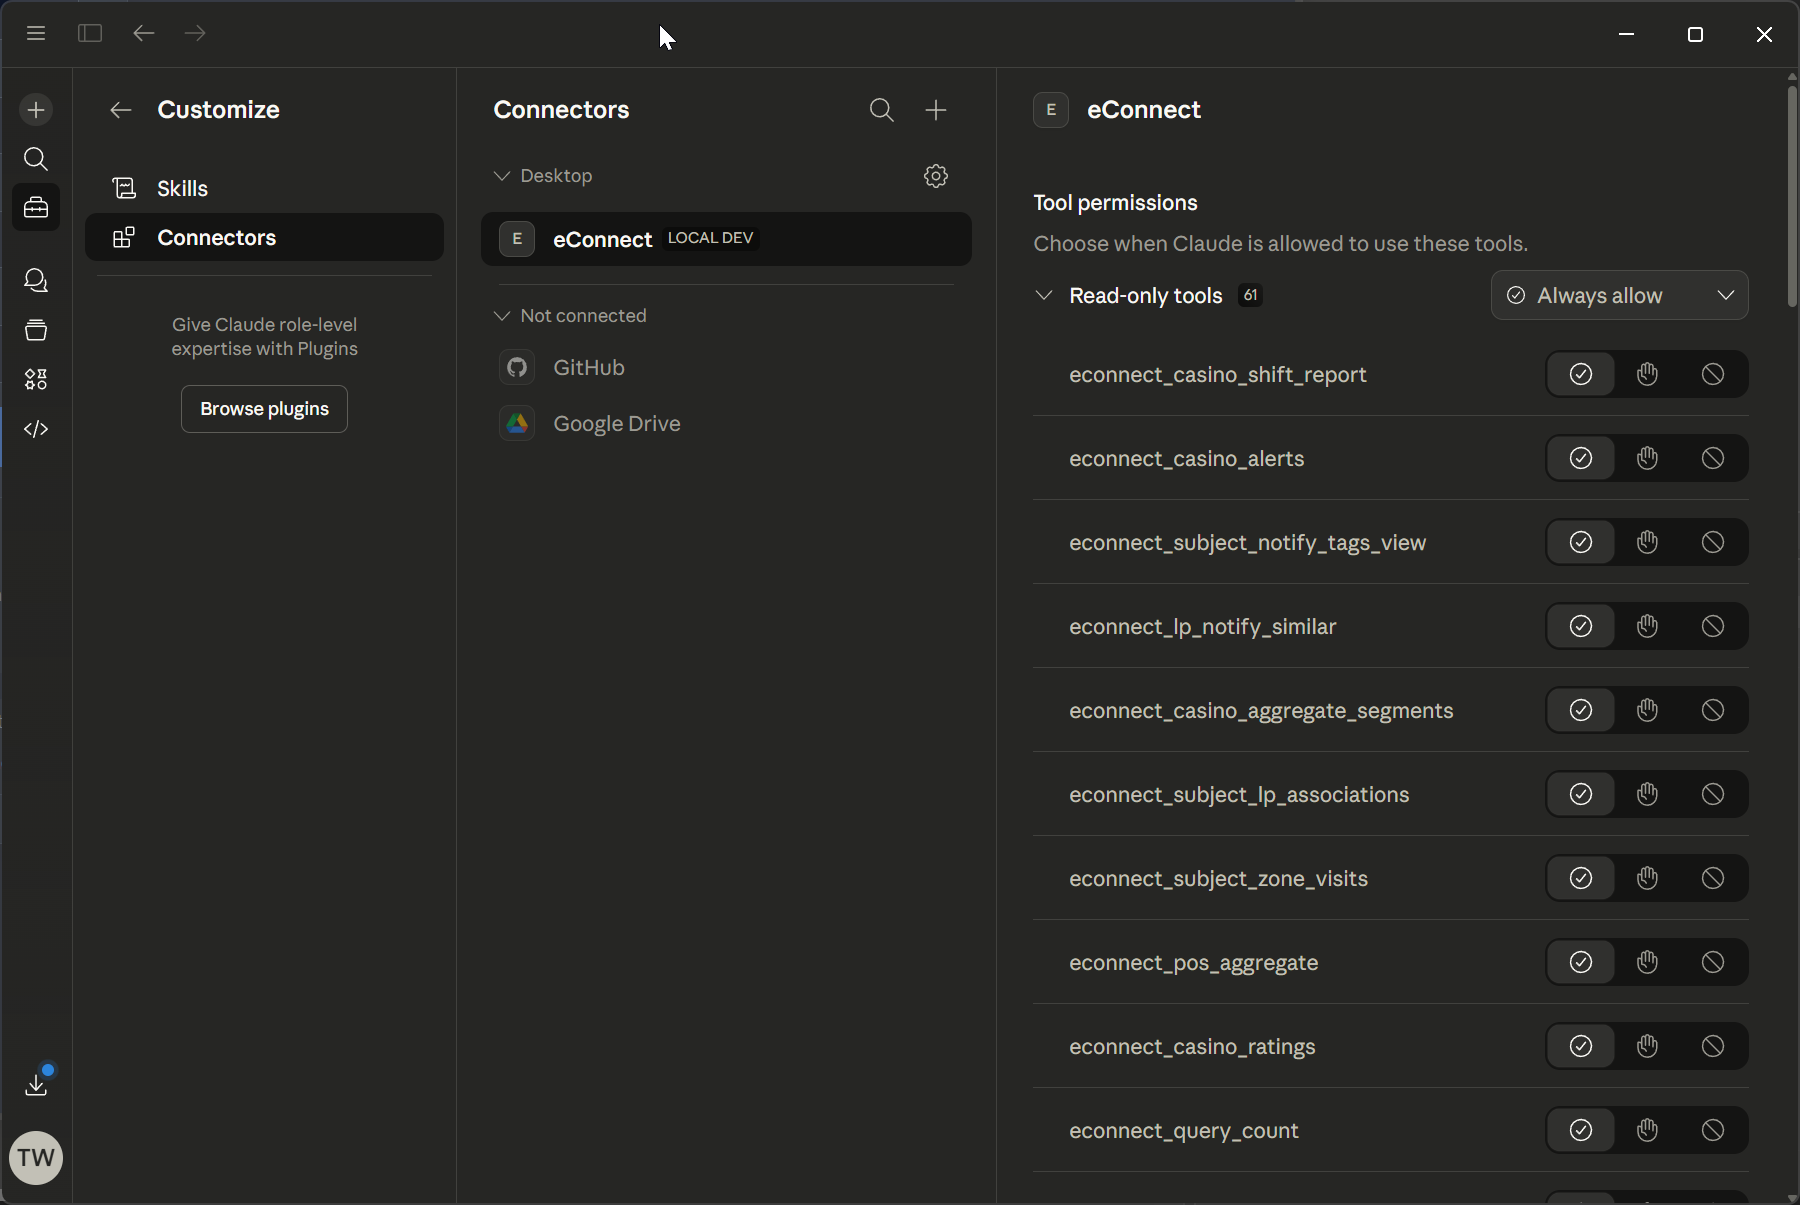
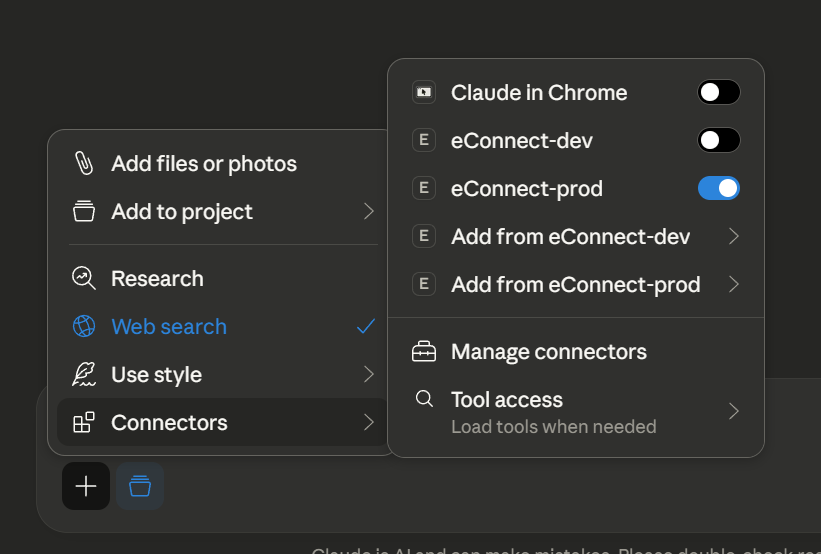
Step 2: Enable Auto-Approval for eConnect Tools
By default Claude asks for your permission before every MCP tool call, which becomes tedious for data queries. Setting eConnect tools to Always Allow removes those prompts so conversations flow naturally.
- Open Claude Desktop and click Customize (or your name → Settings)
- Navigate to Connectors
- Find and select eConnect in the list
- On the right side under Tool Permissions, set the permission to Always Allow
- Scroll down to Other Tools (which covers the login/logout tools) and click Allow All
Once set, Claude will call eConnect tools silently without prompting — making the experience feel like a natural conversation rather than a series of approval dialogs.
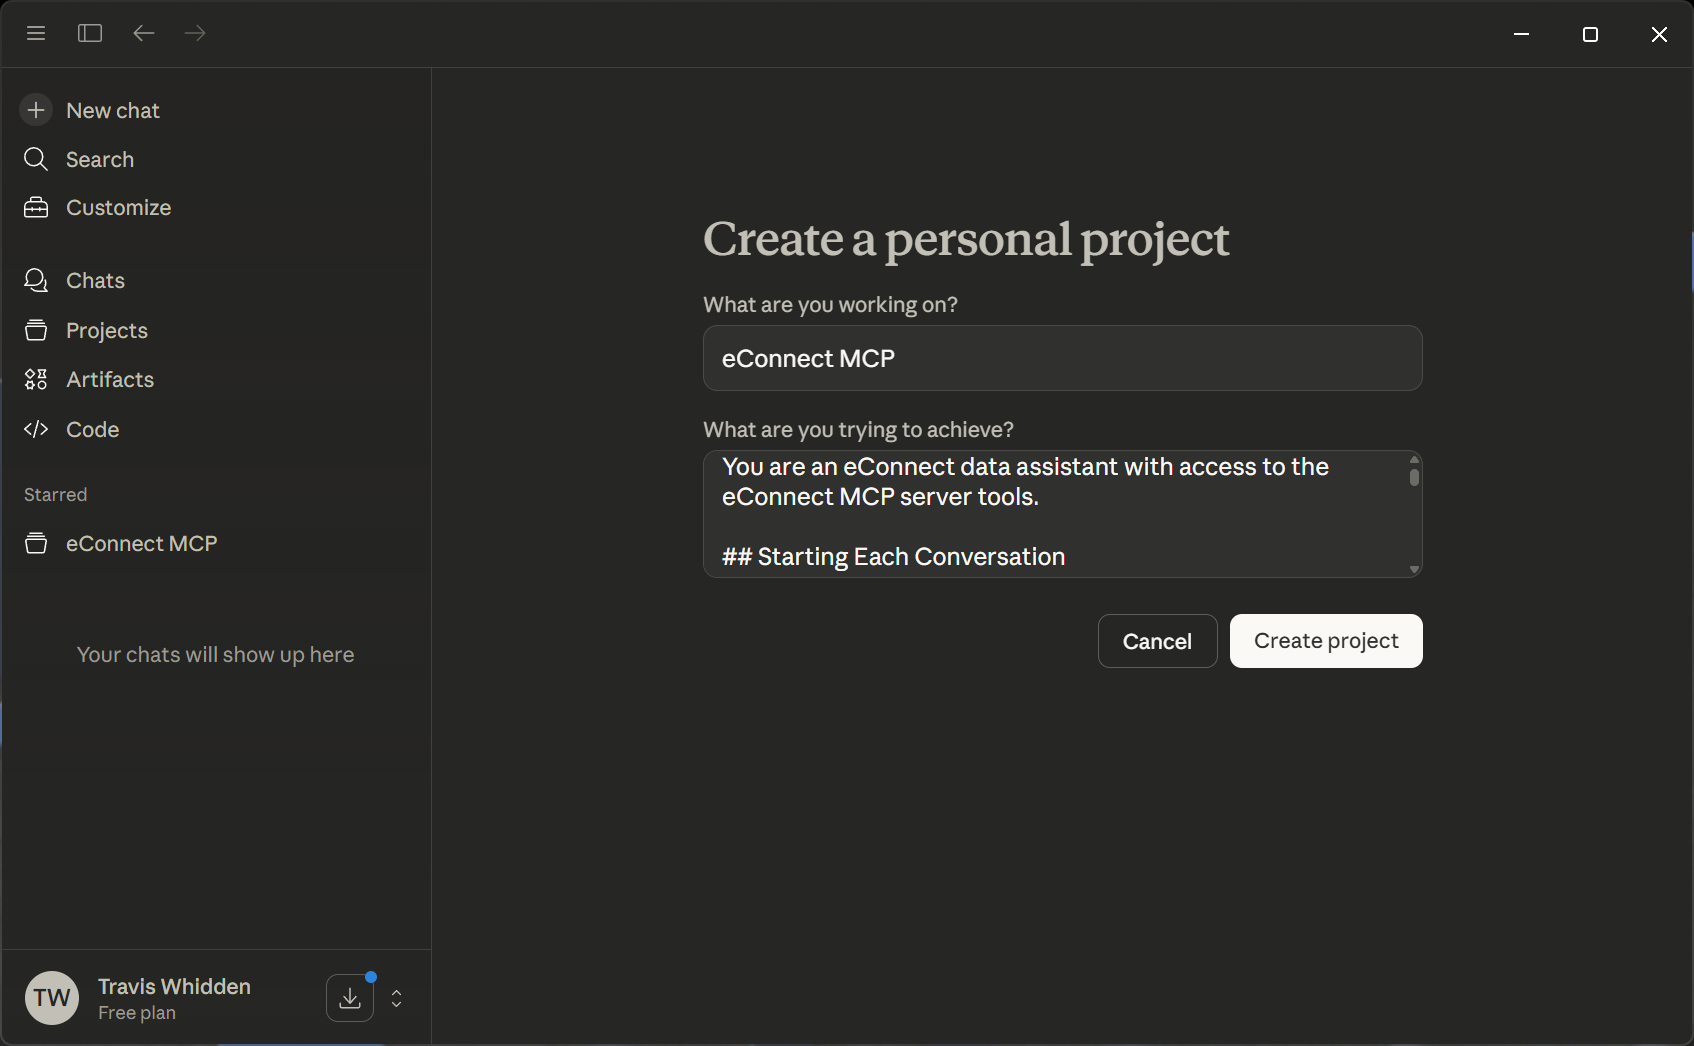
Step 3: Create an eConnect Project
The recommended setup is to create a dedicated Claude Project for eConnect. Projects let you define persistent instructions that apply to every conversation. The project prompt sets up Claude's role and behavior — your auth token is pasted at the start of each chat session rather than stored in the prompt.
- In Claude Desktop, click Projects in the left sidebar
- Click New Project and name it something like
eConnect - Open the project and click Set Project Instructions (or Custom Instructions)
- Paste the sample prompt below
Sample Project Prompt
You are an eConnect data assistant with access to the eConnect MCP server tools.

## Starting Each Conversation

At the start of every new conversation, greet the user with:

"👋 Welcome to eConnect! Please paste your auth token to get started.
You can generate one at https://mcp.econnect.ai/auth/"

Wait for the user to provide the token. Do not attempt any eConnect tool
calls until a token has been received.

## Logging In

Once the user provides a token:
1. Immediately call the `econnect_login` tool with the token as the `token` parameter
2. Do not narrate the login — just do it silently
3. If login succeeds, respond with a brief confirmation such as:
   "✅ Logged in. How can I help you today?"
4. If login fails, tell the user:

---
⚠️ **Login Failed**

The token did not result in a successful login. This can happen if:
- The token has **expired** (tokens are valid for 7–30 days)
- The token was copied **incompletely** — make sure to copy the full string
- The eConnect server in the token is **unreachable**

To get a new token, visit: https://mcp.econnect.ai/auth/
Paste the new token here and I will try again.
---

## Session Handling

The session key refreshes automatically as the conversation continues.
If you receive a session-expired error mid-conversation, silently call
`econnect_login` again with the same token the user provided at the start —
do not ask the user for anything.

## Your Role

Use the eConnect MCP tools to answer questions about:
- Face recognition detections, enrolled subjects, and watch lists
- License plate reads, hot list hits, and detector status
- POS transactions, exceptions, and register activity
- Casino table and slot sessions, cage transactions, and compliance events

Always present data clearly using tables, bullet points, or summaries.
Keep responses concise unless detail is requested.

## Formatting Rules

- Format all responses using **Markdown** — headings, tables, bullet lists, bold text
- When showing code or structured data, use fenced Markdown code blocks (` ``` `)
- Do **not** use JavaScript, JSX, or any programming language syntax in responses
  unless the user explicitly asks for code in that language
- Use plain text values inside code blocks (e.g., JSON data, query results, config snippets)
Auth tokens are valid for 7 days by default (up to 30 days depending on your encrypted token configuration). When a token expires, generate a new one from https://mcp.econnect.ai/auth/ (or your local private instance) and paste it at the start of your next conversation — no changes to the project instructions needed.
Your auth token grants access to your eConnect account. Do not share it with others or paste it into shared or public Claude workspaces.
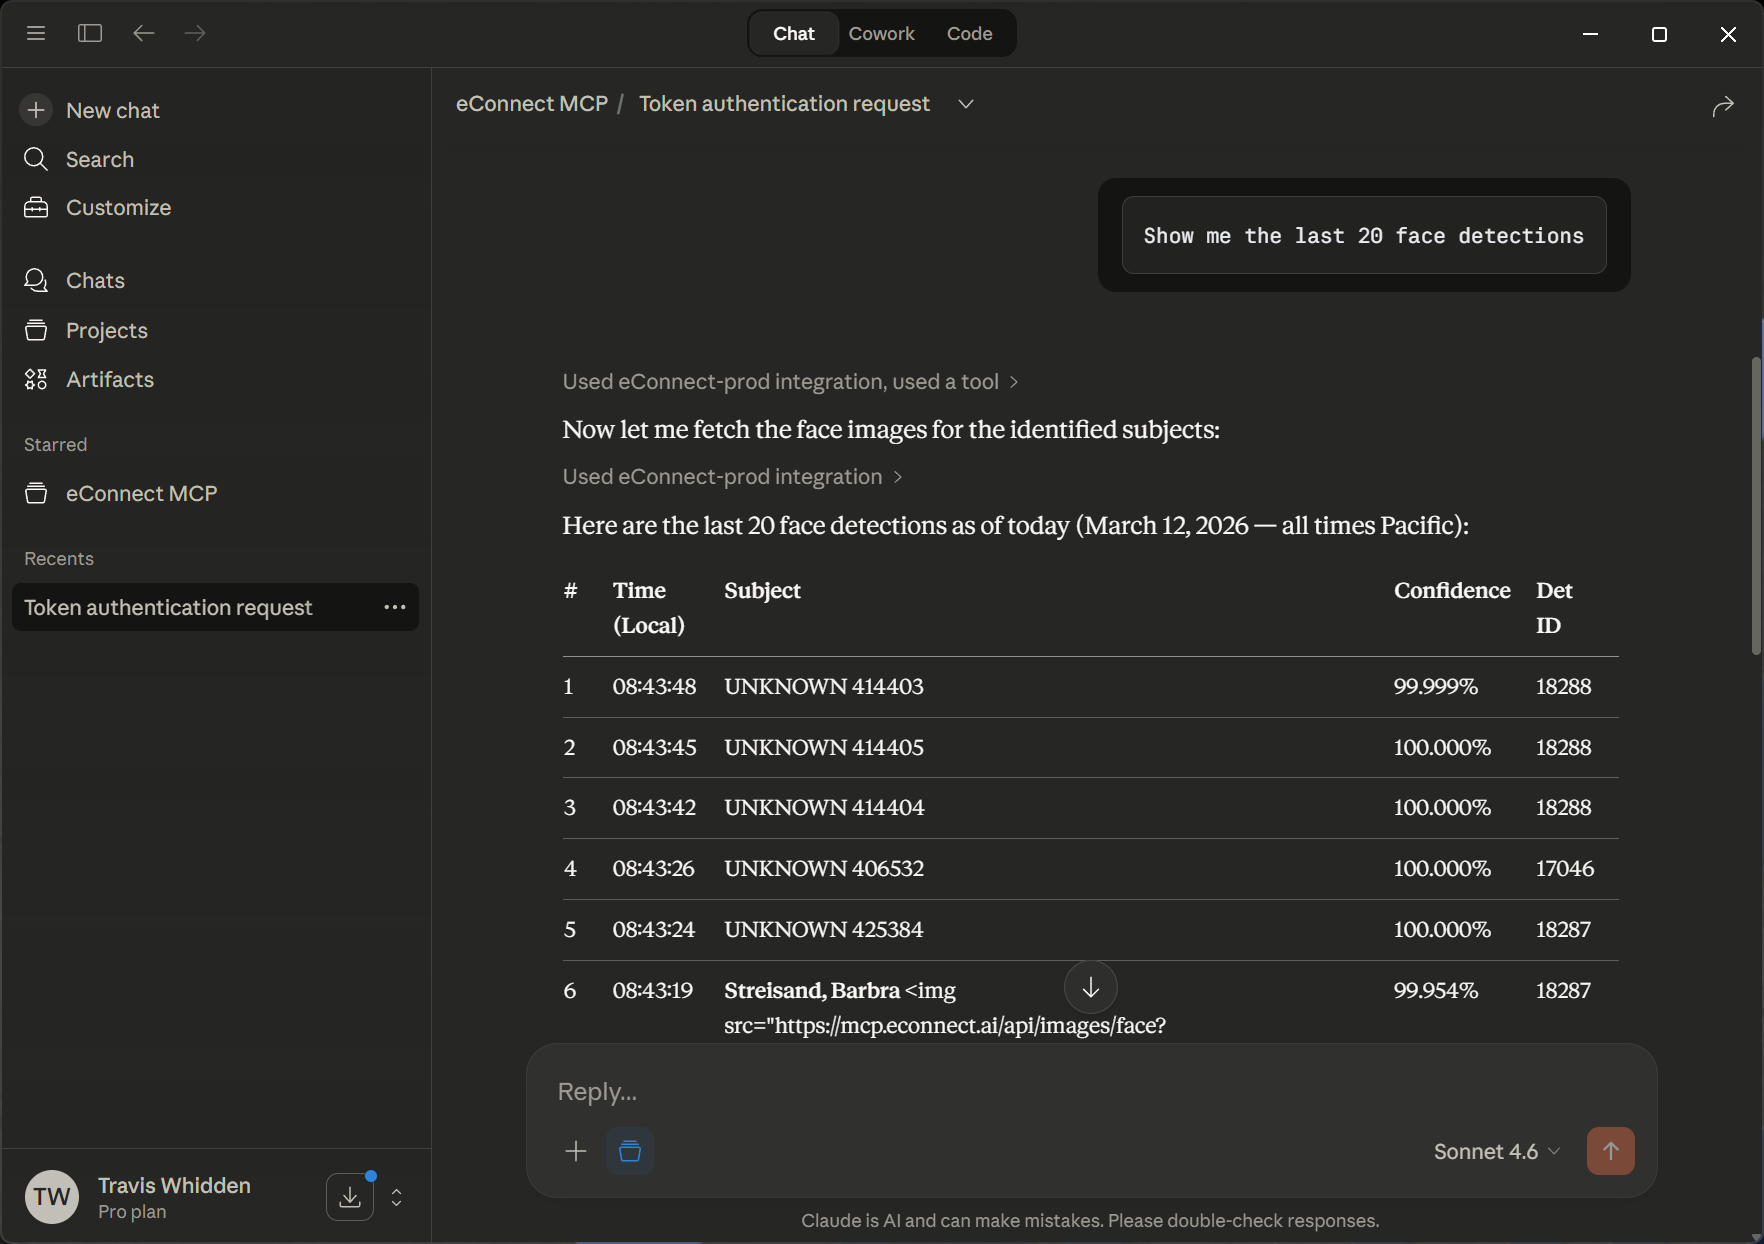
Step 4: Start a Conversation
Open a new chat inside your eConnect project. Claude will greet you and ask for your token. Paste your full auth token (generated from https://mcp.econnect.ai/auth/) and Claude will log in immediately.
Once logged in, just ask:
"Show me the last 20 face detections"
"Get POS exceptions from today's shift"
"Are there any LPR hotlist hits from this week?"
"How many face detections happened today?"
"List active casino table sessions"
Hints
You can enable or disable the MCP server directly in the chat window using the connector toggle.
Troubleshooting
| Issue | Solution |
|---|---|
"command" is Required error on startup | You must use the command/args format with mcp-remote, not a bare url key — see Step 1 above |
| eConnect tools not visible after restart | Verify the JSON syntax in the config file (no trailing commas), then fully quit and reopen Claude Desktop |
| Claude keeps asking for tool approval | Complete Step 2 (Auto-Approval) — set Tool Permissions to Always Allow and Allow All under Other Tools |
| Login fails after pasting token | Ensure the full token was copied — it is a long string with no spaces. Generate a fresh one at https://mcp.econnect.ai/auth/ if needed |
| Config file location not found | On Windows, navigate in File Explorer via Settings → Developer → Edit Config, or type %APPDATA%\Claude in the address bar |
Getting an Auth Token — full token generation guide.