Face Verify Configuration
Every Face Verify device has a built-in setup menu that lets you tune how it captures faces, connect it to your Identities server, customize the colored overlays customers see, and share that configuration with other devices.
This page walks through every setting available in the app.
Accessing the Setup Menu
The setup menu is protected by a PIN so customers and staff cannot change device settings at the kiosk.
- Tap the settings icon in the upper-left corner of the camera view.
- A PIN prompt appears.
- Enter your PIN and tap Authenticate.
- The setup tabs (General, Identities, Themes, About) load.
⚙️ Hidden Settings Button
![]()
🔒 PIN Authentication
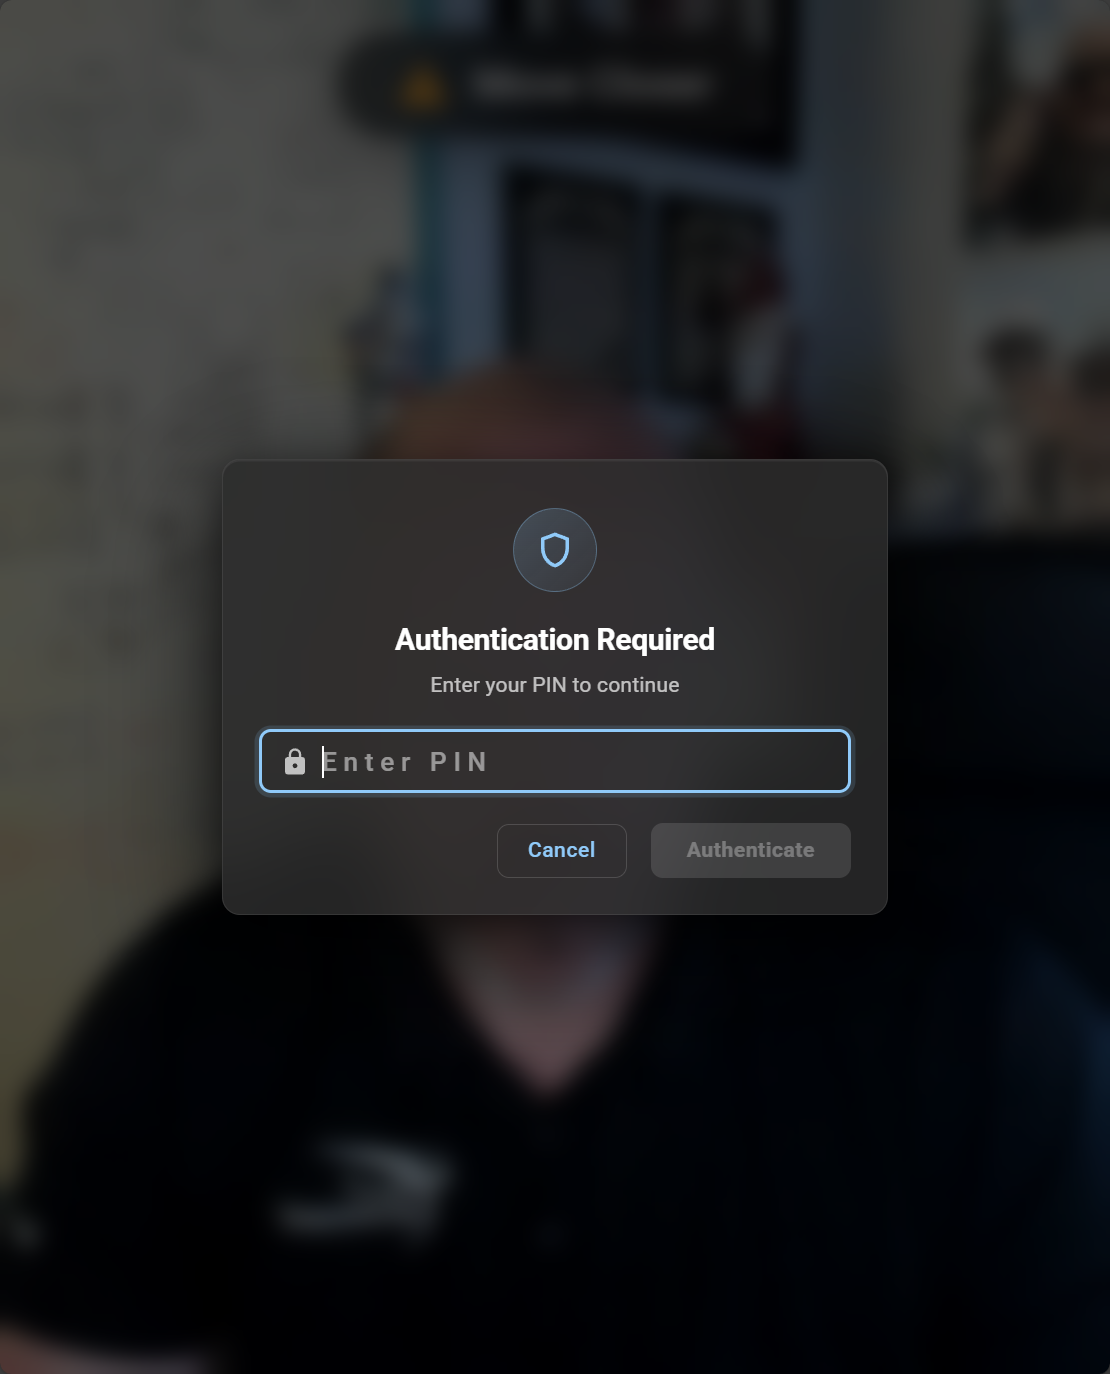
New devices ship with a known default PIN. For security reasons we don't publish it here — contact eConnect support at 702-523-8786 to request it. Once you're in, head to General → Display and set your own Authentication PIN, then share that PIN only with staff who should be able to reconfigure kiosks.
General Tab
The General tab has three sub-tabs: Display, Detection, and Sharing.
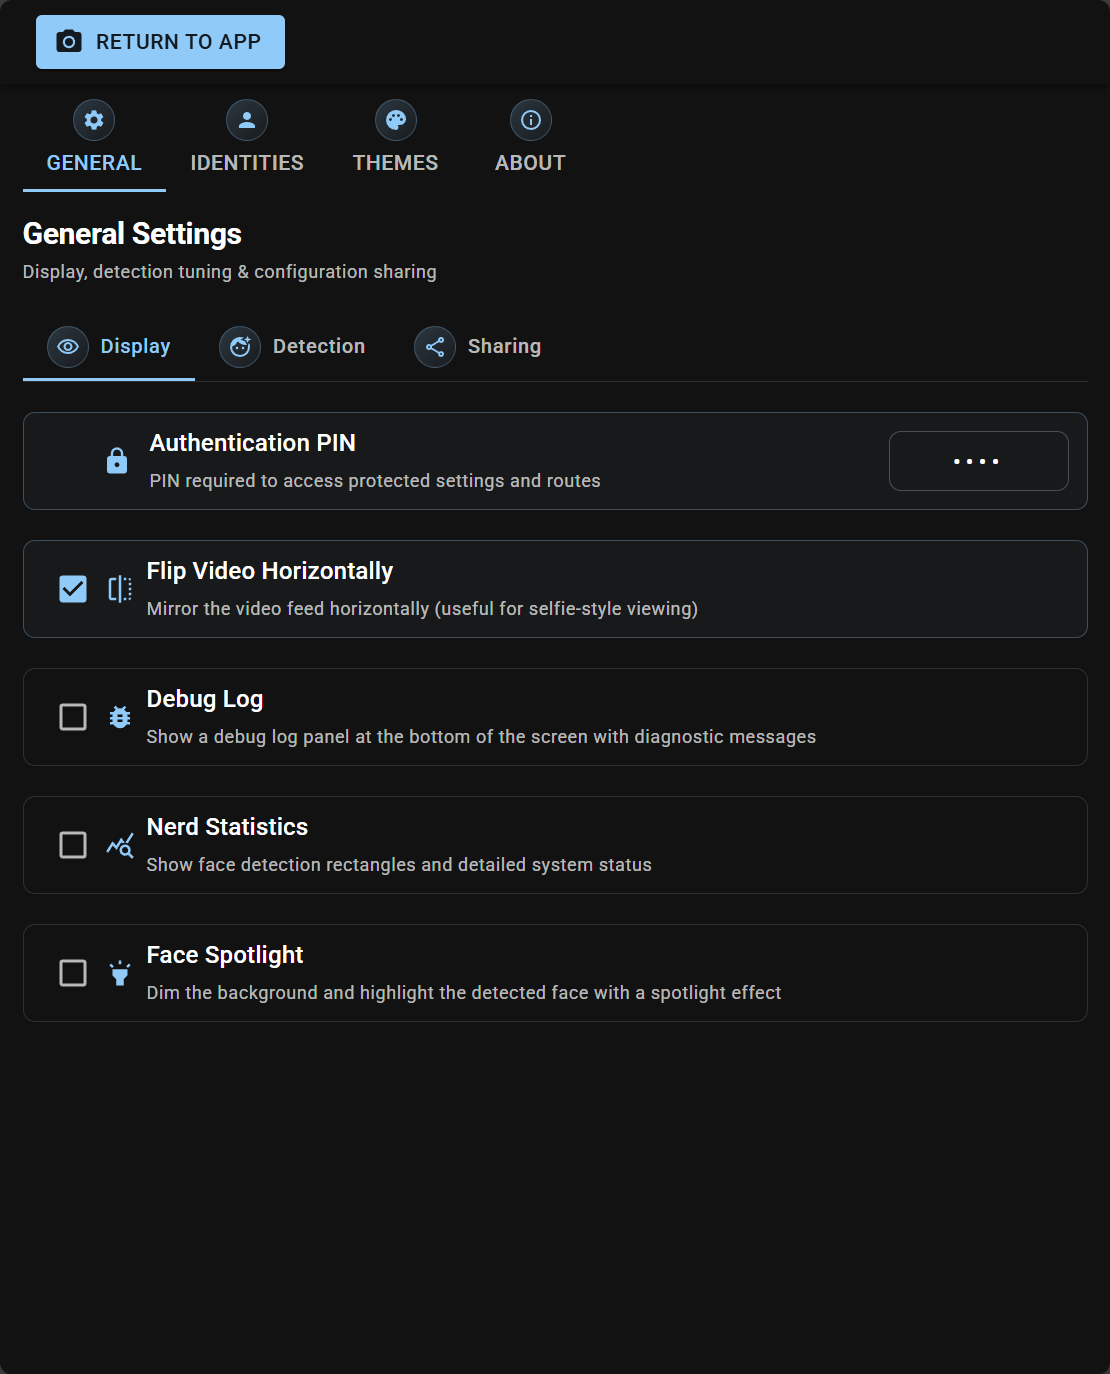
Display
Controls what the customer sees on the camera screen and who can change device settings.
| Setting | Description |
|---|---|
| Authentication PIN | Numeric PIN that locks the setup menu. Leave blank to disable the lock (not recommended in production). |
| Flip Video Horizontally | Mirrors the camera feed left-to-right for a selfie-style view. Makes the experience feel natural on customer-facing screens. |
| Debug Log | Shows a diagnostic log panel at the bottom of the screen. Use this while troubleshooting; turn it off in production. |
| Nerd Statistics | Overlays face-detection rectangles and detailed system status on the video. Useful for tuning detection, distracting for customers. |
| Face Spotlight | Dims the background and puts a spotlight on the detected face. A nice visual cue that tells the customer "we see you". |
Detection
Tunes how Face Verify decides which faces to capture and when to send them to the server. The settings are grouped into Timing & Thresholds and Quality & Size.
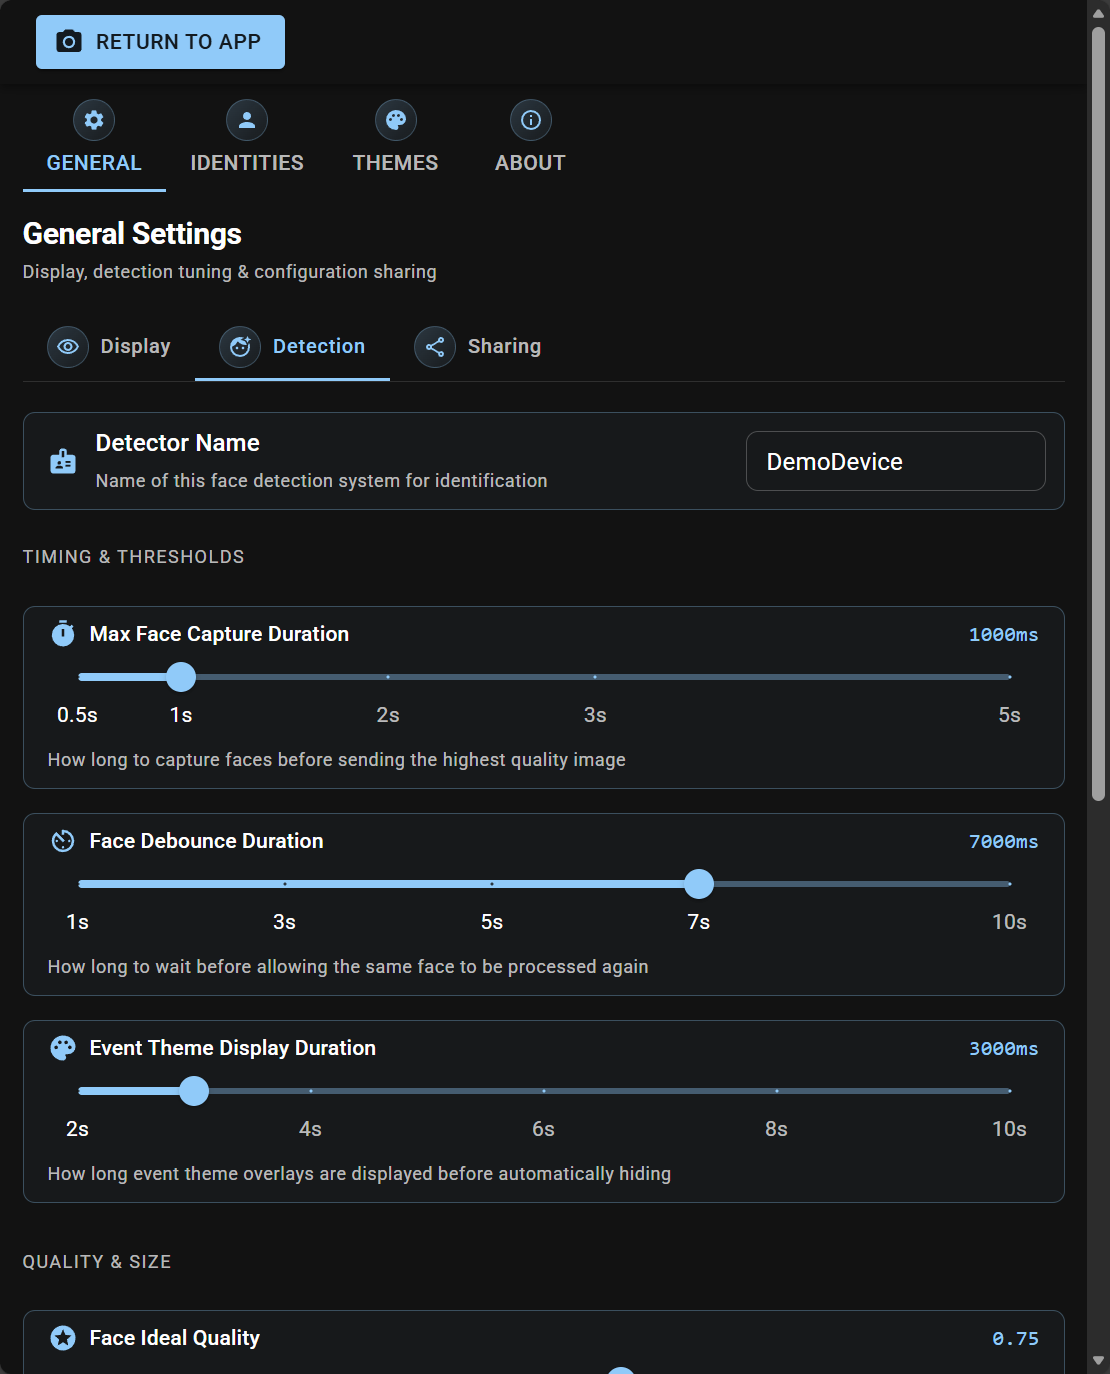
Detector Name
A friendly name for this device — shown in event streams and on the Identities server so operators know which kiosk a face came from. Examples: Front Lobby Tablet, Cage Entry Kiosk, VIP Lounge.
Timing & Thresholds
These sliders control how long Face Verify watches a face before acting, and how quickly it can re-process the same person.
| Slider | Range | What It Does |
|---|---|---|
| Max Face Capture Duration | 0.5s – 5s | The longest window the app will spend collecting frames of a face before picking the best-quality one and sending it. Shorter = faster response; longer = better chance of catching a sharp frame. |
| Face Debounce Duration | 1s – 10s | How long before the same face is processed again. Prevents the same customer from triggering back-to-back matches if they linger in front of the camera. |
| Event Theme Display Duration | 2s – 10s | How long a colored overlay (green / yellow / red) stays on screen after a match. Long enough for the customer to read it, short enough to clear for the next person. |
Quality & Size
These sliders decide which captured faces are good enough to bother sending to the server. Tighter settings mean fewer false positives — but the customer has to work a little harder to get in frame.
| Slider | Range | What It Does |
|---|---|---|
| Face Ideal Quality | 0.40 – 1.00 | If the app sees a face this good, it sends it immediately without waiting out the Max Capture Duration. Lower = react faster; higher = always wait for a great frame. |
| Min Face Size Percent | 5% – 100% | Minimum size of the face relative to the camera image. Faces smaller than this trigger a "Move Closer" prompt. Raise this for tablets where customers are very close; lower it for wall-mounted cameras that cover a wide area. |
| Min Face Quality | 0.00 – 1.00 | Minimum overall quality score. Blurry, poorly-lit, or obscured faces below this are ignored entirely. |
| Min Frontality | 0.00 – 1.00 | How straight-on a customer must be looking. At 0.0 a side-profile is fine; at 1.0 they must be staring directly at the camera. |
| Face Expansion Factor | 1.0× – 5.0× | How much extra area around the face is included in the captured image. 1.0× is a tight crop; 5.0× captures shoulders, background, and context. Higher values help the server's matching and give operators richer event images. |
⏱️ Timing & Thresholds
🎯 Quality & Size
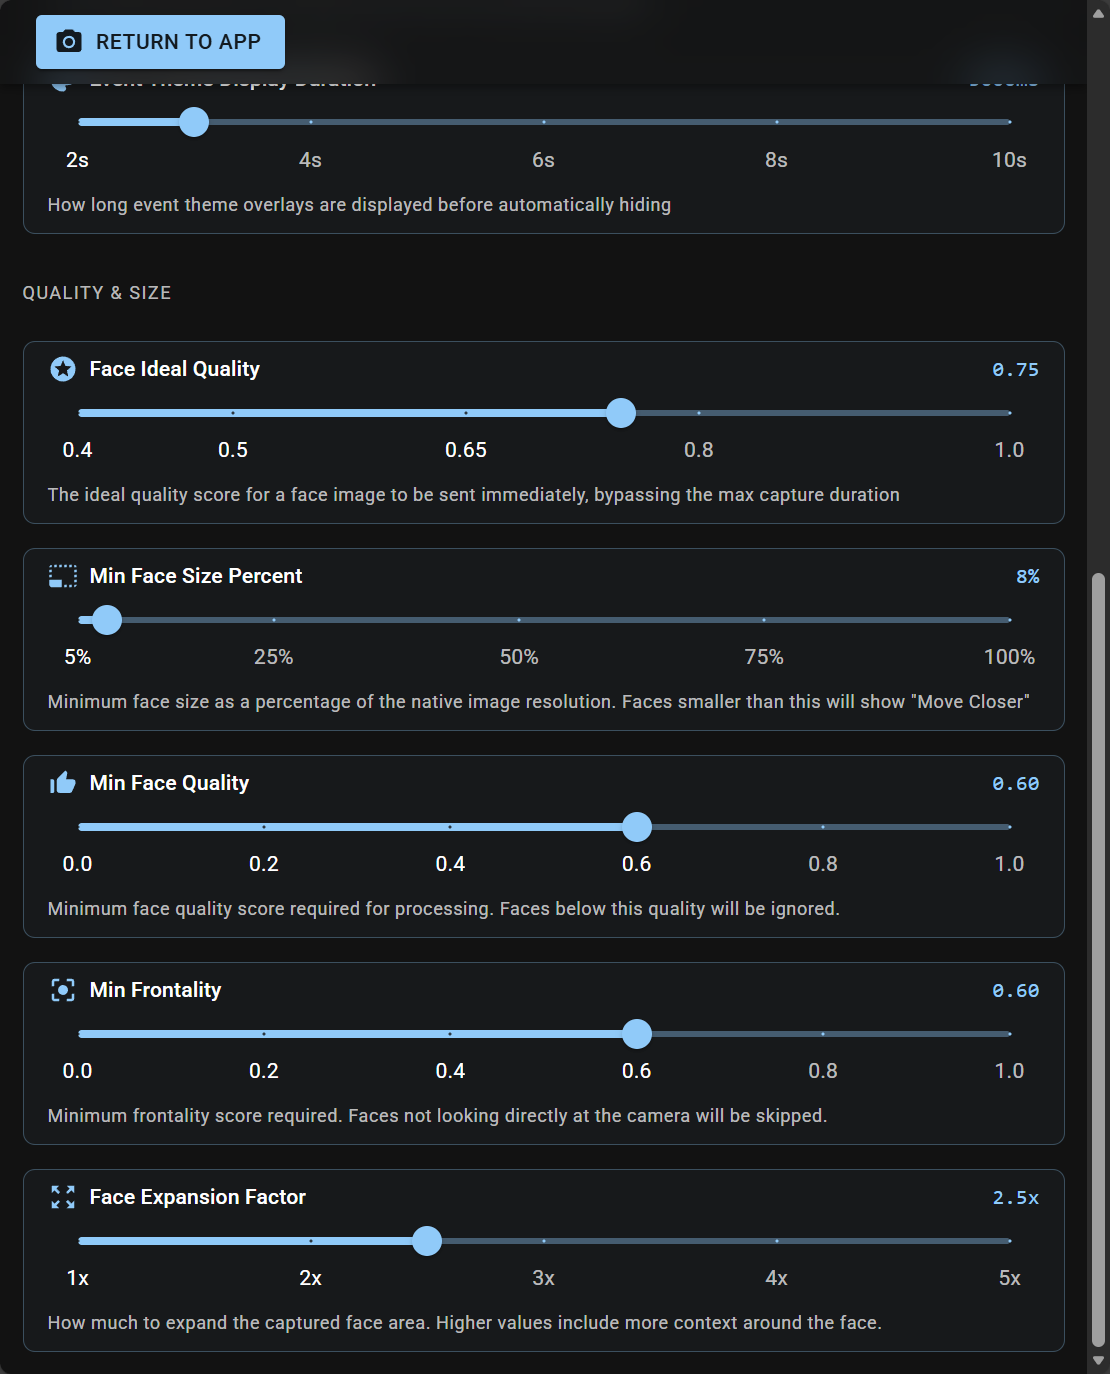
Turn on Nerd Statistics in the Display sub-tab while you adjust the Detection sliders. You'll see live quality, frontality, and size values overlaid on each face — much easier than guessing.
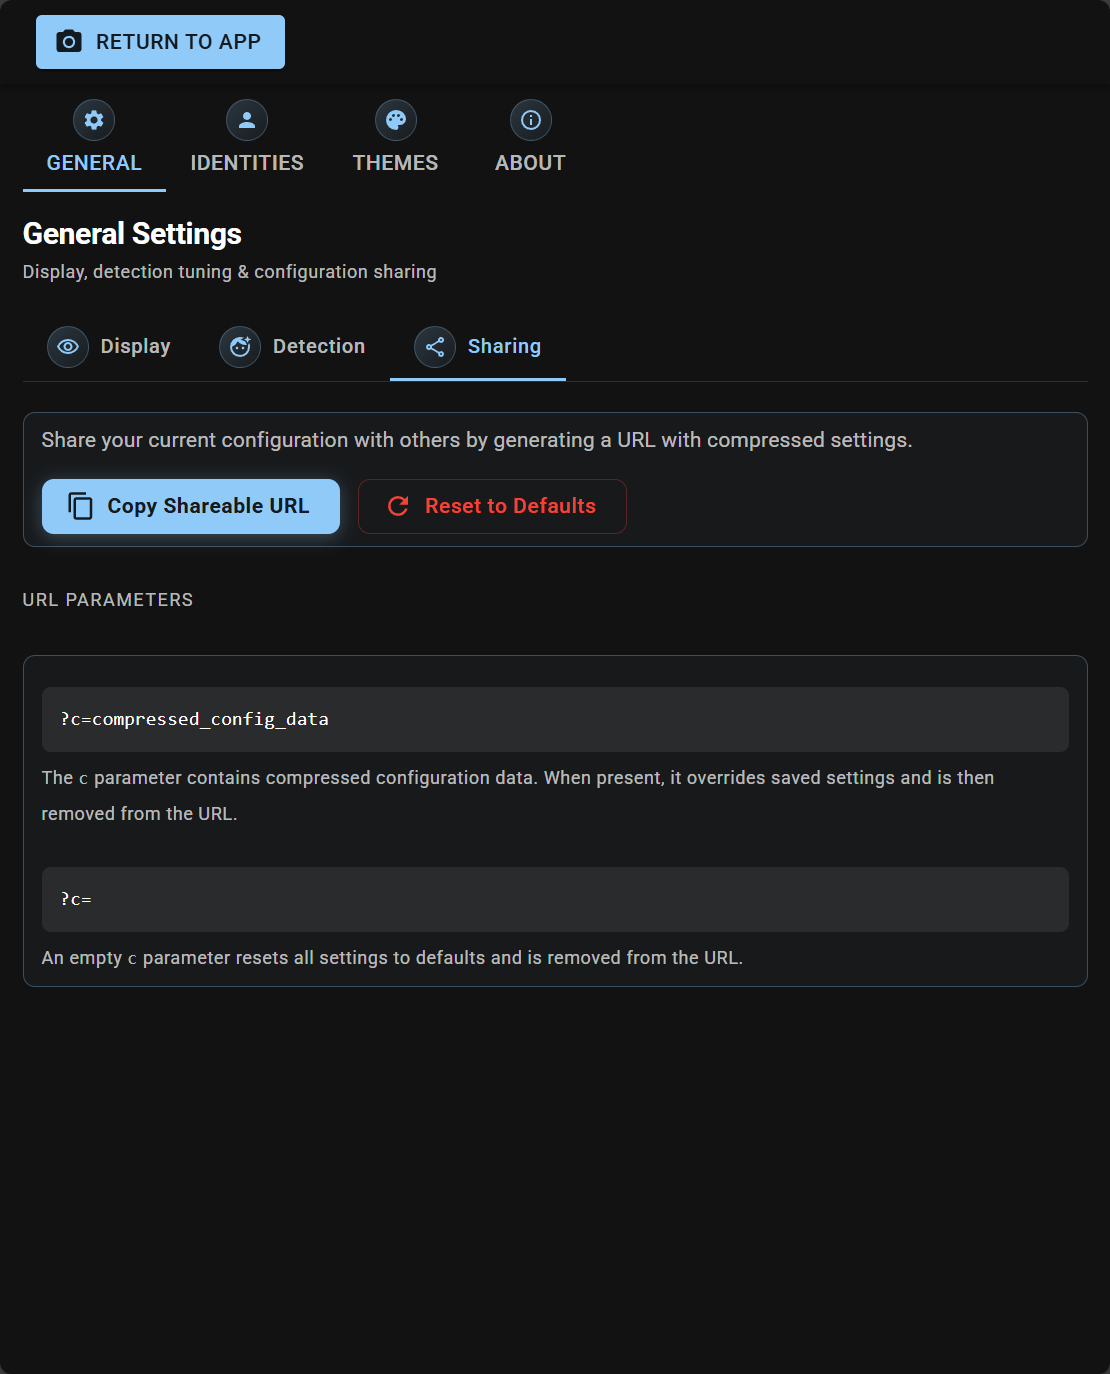
Sharing
This sub-tab lets you export the device's current settings as an encrypted URL, and reset everything back to defaults.
Copy Shareable URL
Tap Copy Shareable URL to generate a URL like:
https://face-verify.example.com/?c=<encrypted-configuration-blob>
What it contains:
- All General settings (Display + Detection)
- All custom Event Themes you've configured
- Not included: Identity Server credentials (for security — usernames and passwords never leave the device)
How to use it:
- Configure one device exactly how you want it.
- Tap Copy Shareable URL — the URL is copied to the clipboard.
- Paste the URL into the browser of another device running Face Verify.
- The new device loads the settings, saves them locally, and automatically cleans the
?c=...parameter off the URL.
This is the fastest way to deploy identical configurations across many kiosks.
Reset to Defaults
Tap Reset to Defaults to restore every General setting and every Event Theme to the factory defaults. You will be asked to confirm — the action cannot be undone.
You can also reset remotely: visiting a URL with an empty ?c= parameter (just https://face-verify.example.com/?c=) will wipe the device's saved settings and reload with defaults.
🔗 Sharing Sub-Tab
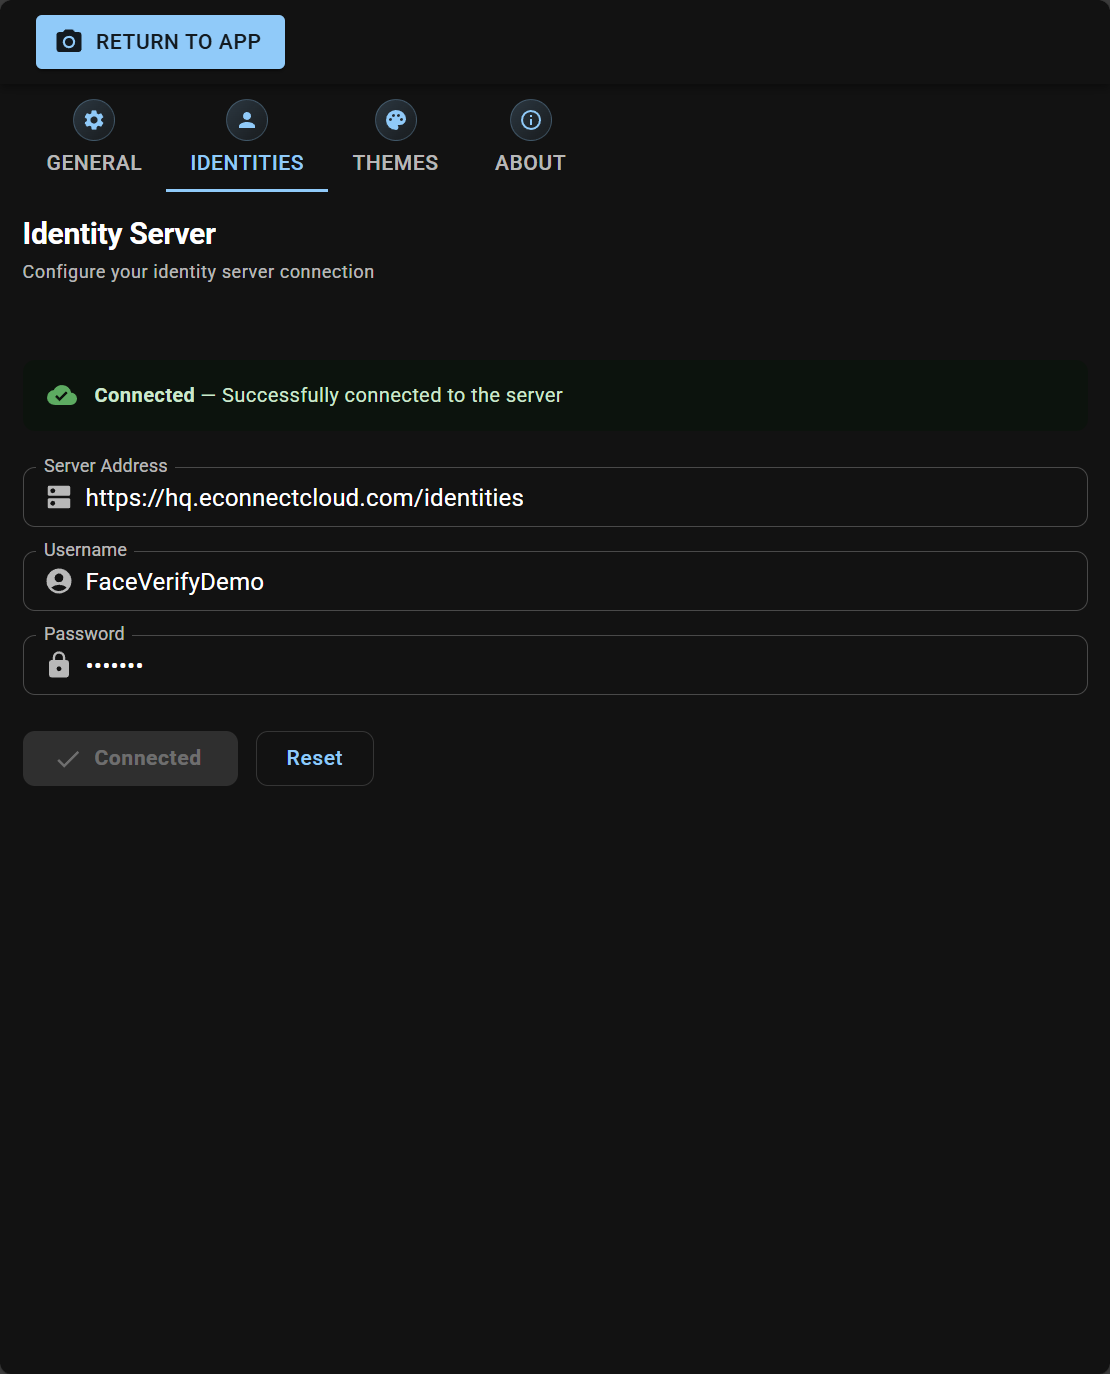
Identities Tab
This is where you point the device at your eConnect Identities server — the service that stores enrolled faces and performs matching.
| Field | Description |
|---|---|
| Server Address | Full URL of your Identities server (e.g. https://identities.your-site.com). |
| Username | The Identities account Face Verify should log in as. |
| Password | The password for that account. |
| Connect | Tests the credentials and opens the live connection. A green banner appears when connected. |
| Reset | Clears all three fields and disconnects. |
🖥️ Identity Server Configuration
Required Permissions
The specific Identities server permissions required by the Face Verify service account will be listed here. Contact eConnect support in the meantime if you are setting up a new device and need this information.
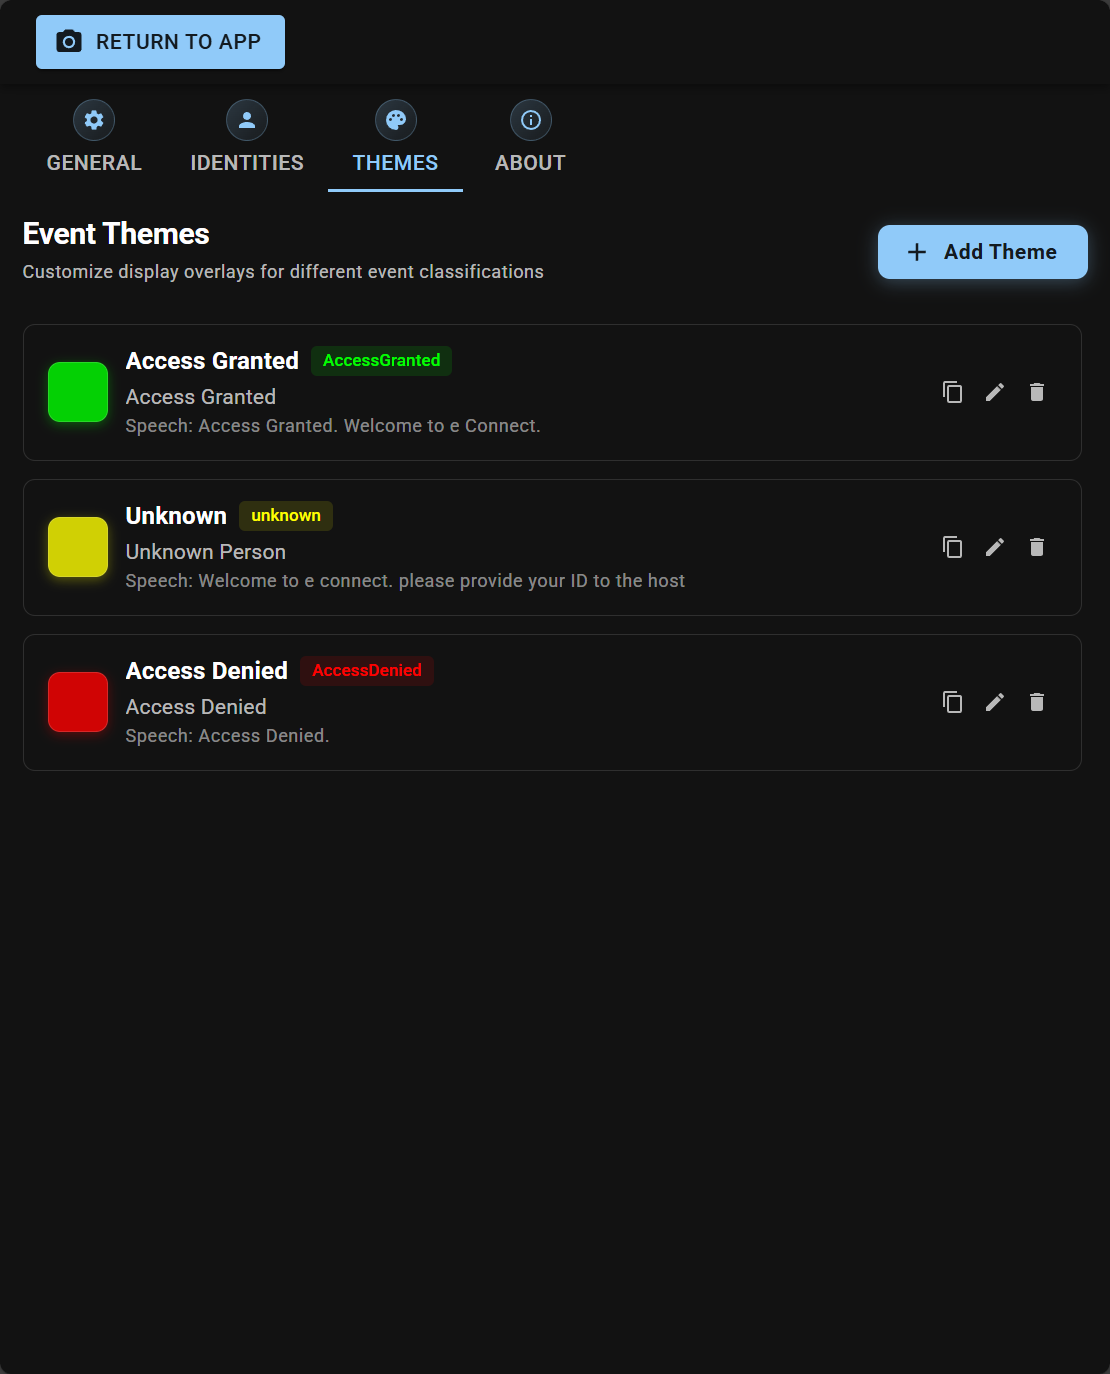
Themes Tab
Event Themes are what a customer sees when a match event fires — the colored full-screen overlay, the message, and the optional spoken voice prompt.
Each theme is tied to an event classification returned from your organization's workflow rules. When a match comes back with classification X, the theme named X is displayed.
A theme defines:
- Name — the classification it responds to (e.g.
Green Light,Red Light,Known VIP). - Message — the on-screen text (e.g. "Welcome back, please proceed").
- Speech Message — an optional voice-synthesized announcement.
- Event Classification — the classification string sent by your rules engine.
- Color — the accent color used for the overlay.
You can add, edit, duplicate, and delete themes from this tab. A sensible set of defaults ships with the app — customize them to match your site's language and branding.
🎨 Themes List
✏️ Theme Editor

The color of a theme is what gives you the red-light / yellow-light / green-light behavior. Your workflow rules decide which theme name to send back; that theme's color takes over the screen.
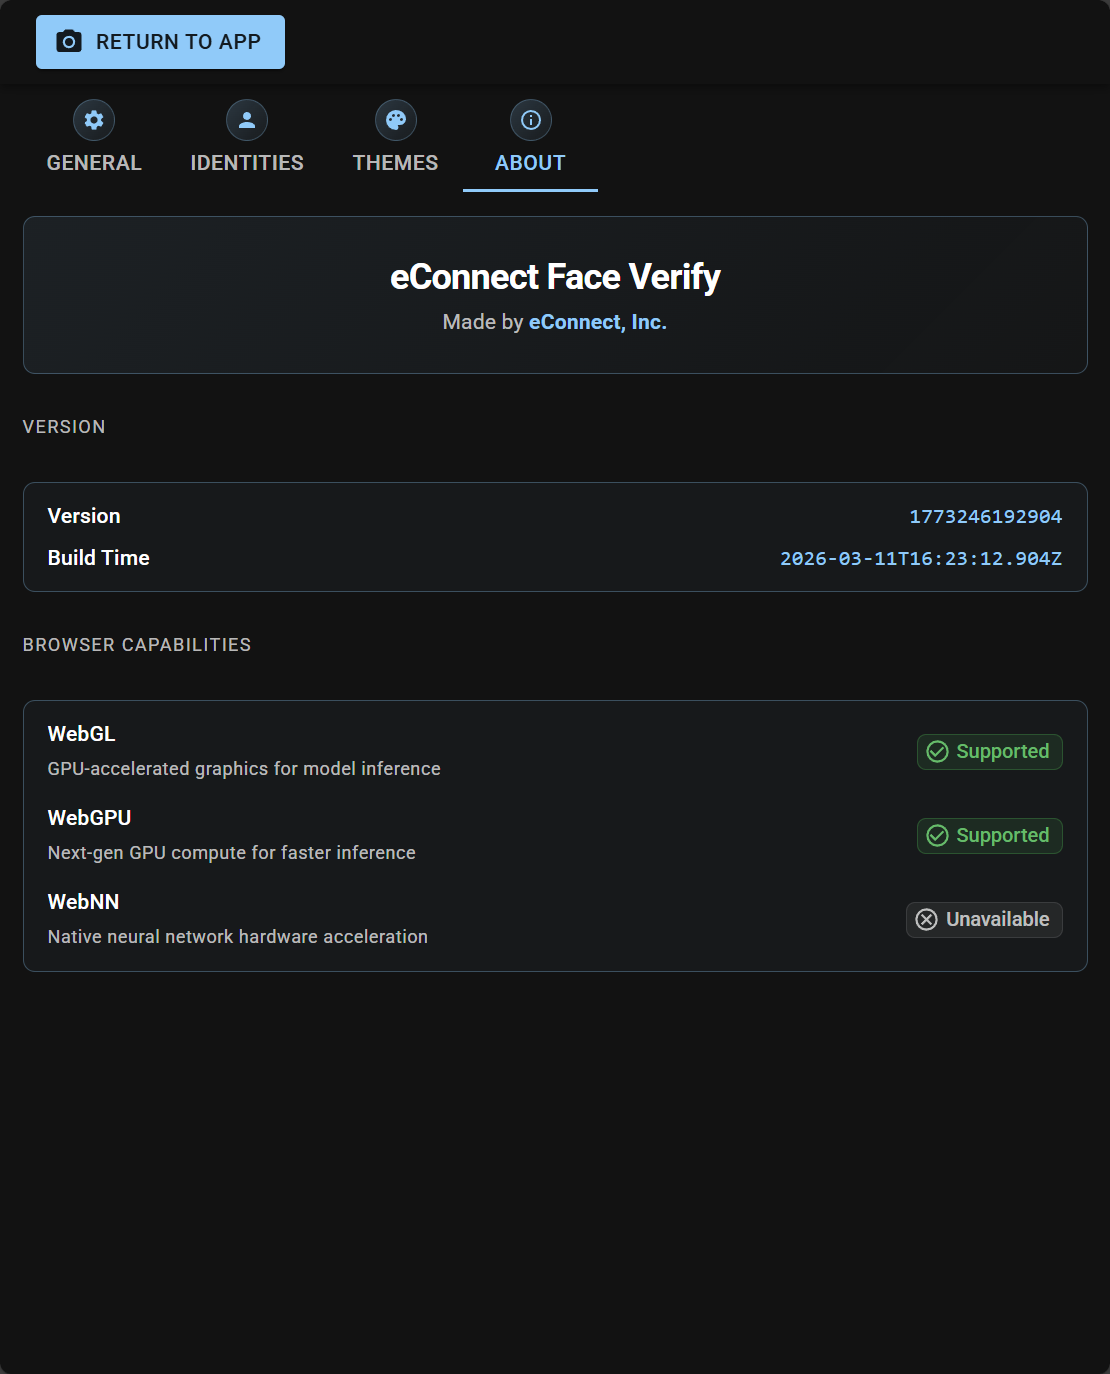
About Tab
A read-only tab for support and diagnostics:
- Version and build timestamp of the installed app.
- Browser capability badges — WebGL, WebGPU, and WebNN. These show whether the device's browser supports the acceleration features the face-detection engine uses.
If you ever open a support case with eConnect, this is the tab we'll ask you to screenshot.
ℹ️ About Tab
Your Settings Are Saved Automatically
Face Verify saves every setting locally inside the device's browser (in what's called local storage). This means:
- You only configure a device once. The next time you open the page, everything — PIN, sliders, server details, themes — is already in place.
- Settings survive reloads, reboots, and power cycles.
- Settings are specific to that browser on that device. Opening the app on a different browser, or a different device, starts with defaults.
- Clearing the browser's site data, using private / incognito mode, or uninstalling the browser will erase the device's settings.
Because of this, the Copy Shareable URL feature in the Sharing sub-tab is the recommended way to back up a configuration and to deploy the same configuration across a fleet of devices.