Manually Setting Up a WebHook in Events Bridge
This guide explains how to manually configure a WebHook in the eConnect Events Bridge platform. WebHooks allow the system to send detection events to a remote server automatically.
Steps to Configure a WebHook
-
Login to the eConnect Events Bridge Program
- Once logged in, navigate to the WebHook Settings tab.
- You can create multiple WebHooks, each capable of sending detection events to a remote server.
-
Create a New WebHook
- Click the option to create a new WebHook, and you'll be prompted to enter the following details:

WebHook Configuration Options
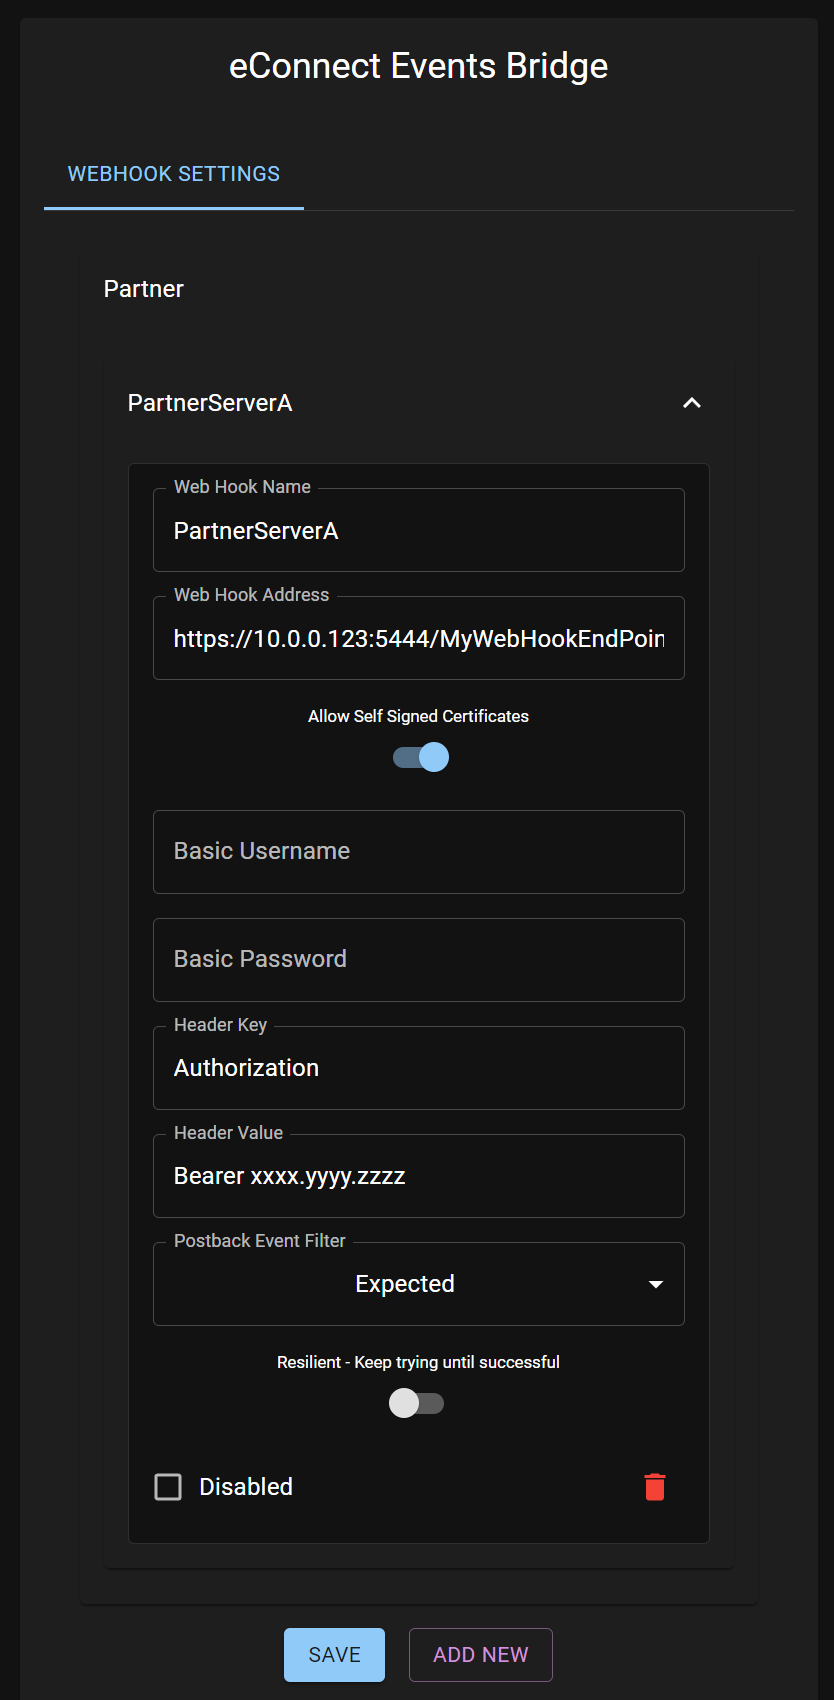
Web Hook Name
- Description: This should be the name of the server to which events are being sent. It's used for support and reference purposes.
- Example:
"SecurityServer1"
Web Hook Address
- Description: This is the full URL where the detection event data (in JSON format) will be posted. Include the protocol (e.g., https), server address, port, and the specific path on the server.
- Example:
"https://myserver.com:443/webhooks/detection"
Allow Self Signed Certificates
- Description: If your remote server uses a self-signed certificate, enable this option. It is disabled by default, so enable it only if the site is secured with a self-signed SSL certificate.
- Note: Only use this option if your server does not have a valid SSL certificate issued by a trusted authority.
Basic Username and Password (Optional)
- Description: If the remote web server uses Basic Authentication to secure the WebHook, provide the username and password here. This information will be included in the request headers.
- Example:
- Username:
"webhook_user" - Password:
"mypassword"
- Username:
Header Key and Header Value (Optional)
- Description: If the remote server requires a specific HTTP header (such as a JWT or other token) for authentication, provide the key and value here.
- Example:
- Header Key:
"Authorization" - Header Value:
"Bearer xxx.yyy.zzz"
- Header Key:
Postback Event Filter
This setting allows you to control what kind of events are sent to the remote server. The following options are available:
Expected
- Description: This option will send only events that have been explicitly enrolled in the system. Each event will contain a valid
externalId, which the partner system should recognize. - Use Case: If your system is only interested in specific entities that have been enrolled.
Any Tagged
- Description: This will send all detection events where an entity has been tagged in the system, even if the partner system did not enroll the entity.
- Use Case: Useful when you want to track entities tagged with certain identifiers, even if they were not originally enrolled by your system.
Specific Tags
- Description: This will send events only for entities that have certain specific tags. You can configure which tags to track by entering them in the input field.
- Configuration:
- If you select Specific Tags, you'll need to type the desired tag in the input box and press Enter to add it to the filter list. This list is case-sensitive, so ensure you type the tags exactly as they appear in the eConnect platform.
- Example:
"VIP","Employee","Banned"
All
- Description: This option will send all detection events, regardless of whether the entity is enrolled, tagged, or unknown.
- Use Case: If you want to receive every event, including unknown entities, choose this option.
Save and Activate the WebHook
After entering the required information, click Save to activate the WebHook. The system will now begin posting events to the configured WebHook URL based on the selected event filter settings.
Final Notes
- Ensure your WebHook server is configured to handle incoming HTTP POST requests and is set up for the appropriate authentication (if required).
- For security reasons, it is recommended to use HTTPS, even if the site uses a self-signed certificate.
- You can manage and review the status of WebHooks anytime in the WebHook Settings tab.
This concludes the guide on how to manually set up a WebHook in eConnect Events Bridge. Let us know if you need further assistance or clarification.