First-Time Setup
This guide will walk you through the initial configuration of the eConnect plugin within the Mirasys System Manager Application. Please ensure you have the necessary administrative privileges and eConnect server details before proceeding.
Prerequisites
Before configuration, confirm you have:
-
System Requirements:
- eConnect Server: Version 10.2 or higher
- Mirasys VMS: Version 9.8 or higher
- Operating System: Windows 64-bit
-
Administrative Access:
- Administrative privileges to the Mirasys System Manager Application.
- Access to modify Service Profile configurations.
-
eConnect Server Details:
- The DNS name or IP address of the eConnect server.
- Network connectivity between Mirasys and the eConnect server.
-
Required Files:
- eConnect Spotter Plugin License File: Obtained from Mirasys
- eConnect.Mirasys.Spotter.Plugin.spi: The client plugin installation file
-
Licensing Requirements:
- The eConnect plugin must be purchased from eConnect for use in Mirasys. Contact your eConnect account representative to get this added to your account.
- A valid Mirasys license for the eConnect Spotter Plugin is required. Contact Mirasys to obtain this license if you don't already have it.
Critical Requirement: Camera Naming Convention
Every camera registered in the eConnect system must have a name that begins with a unique numeric ID. This is not optional — cameras without a properly formatted name will not function correctly across Mirasys profiles.
Why This Is Required
Mirasys assigns a universally unique identifier (UUID) to each camera per profile. This means the same physical camera will have a different UUID in the "Service" profile than it does in the "eConnect" profile. When eConnect registers a camera using the UUID from one profile, that camera reference becomes invalid the moment a user logs into Mirasys under any other profile — the UUIDs simply do not match.
To work around this, eConnect uses a Logical ID system. Instead of relying on the camera UUID, eConnect parses a numeric prefix from the camera's name and uses that as the stable, cross-profile identifier. Because camera names are consistent across all Mirasys profiles, the Logical ID remains valid regardless of which profile a user is logged into.
Naming Convention
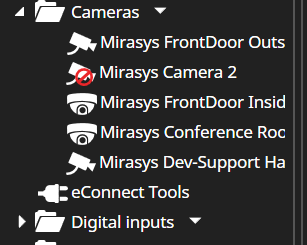
Camera names must start with a unique numeric prefix, followed by a space and a descriptive label. This numeric prefix becomes the Logical ID used by eConnect to identify the camera.
| Format | Example |
|---|---|
[UniqueNumber] [Descriptive Name] | 1001 Main Entrance |
[UniqueNumber] [Descriptive Name] | 1002 Parking Lot North |
[UniqueNumber] [Descriptive Name] | 2045 Server Room Door |
Rules
- The numeric prefix must be unique across all cameras in the system — no two cameras may share the same prefix number.
- The prefix must appear at the very start of the camera name.
- A space must separate the numeric prefix from the descriptive label.
- The numeric prefix is the only part eConnect uses as the Logical ID — the descriptive label is for human readability only.
- This naming convention must be applied in Mirasys before cameras are added to eConnect.
What Happens Without This Convention
If a camera name does not start with a numeric prefix:
- eConnect cannot derive a Logical ID for that camera.
- The camera will fail to resolve correctly when users switch Mirasys profiles.
- Features that depend on camera identification (facial recognition, LPR events, video pop-up) will not work as expected for that camera.
Apply the naming convention to cameras in Mirasys before registering them in eConnect. Renaming cameras after they have been added to eConnect requires re-registration and may cause data mismatches.
Configuration Steps
Step 1: Install Mirasys License for eConnect Spotter Plugin
Before configuring the plugin, you must install the proper license from Mirasys:
-
Obtain License: If you don't have a license for the eConnect Spotter Plugin, contact Mirasys to request one.
-
Open System Manager Application:
- Launch the Mirasys System Manager Application
- Log in with administrative credentials
-
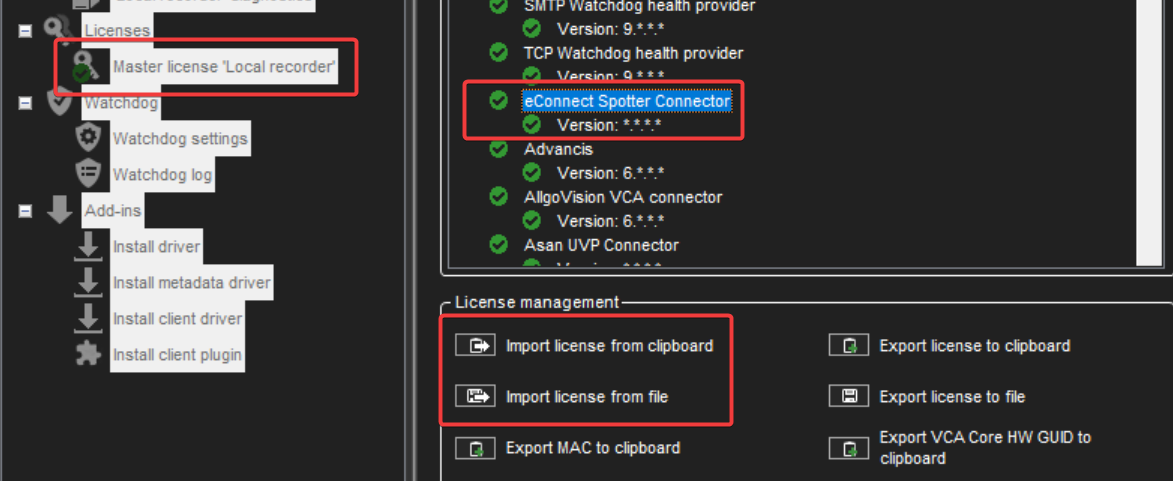
Access License Management:
- Navigate to the Licenses section
- Double-click on the Master License
-
Import License:
- Obtain the updated license file from Mirasys (or copy the license text to your clipboard)
- Click "Import license from clipboard or file"
- Import your license file or paste from clipboard
- Verify that "eConnect Spotter Connector" appears in the license list
Step 2: Install eConnect Client Plugin
After the license is applied, install the client plugin:
-
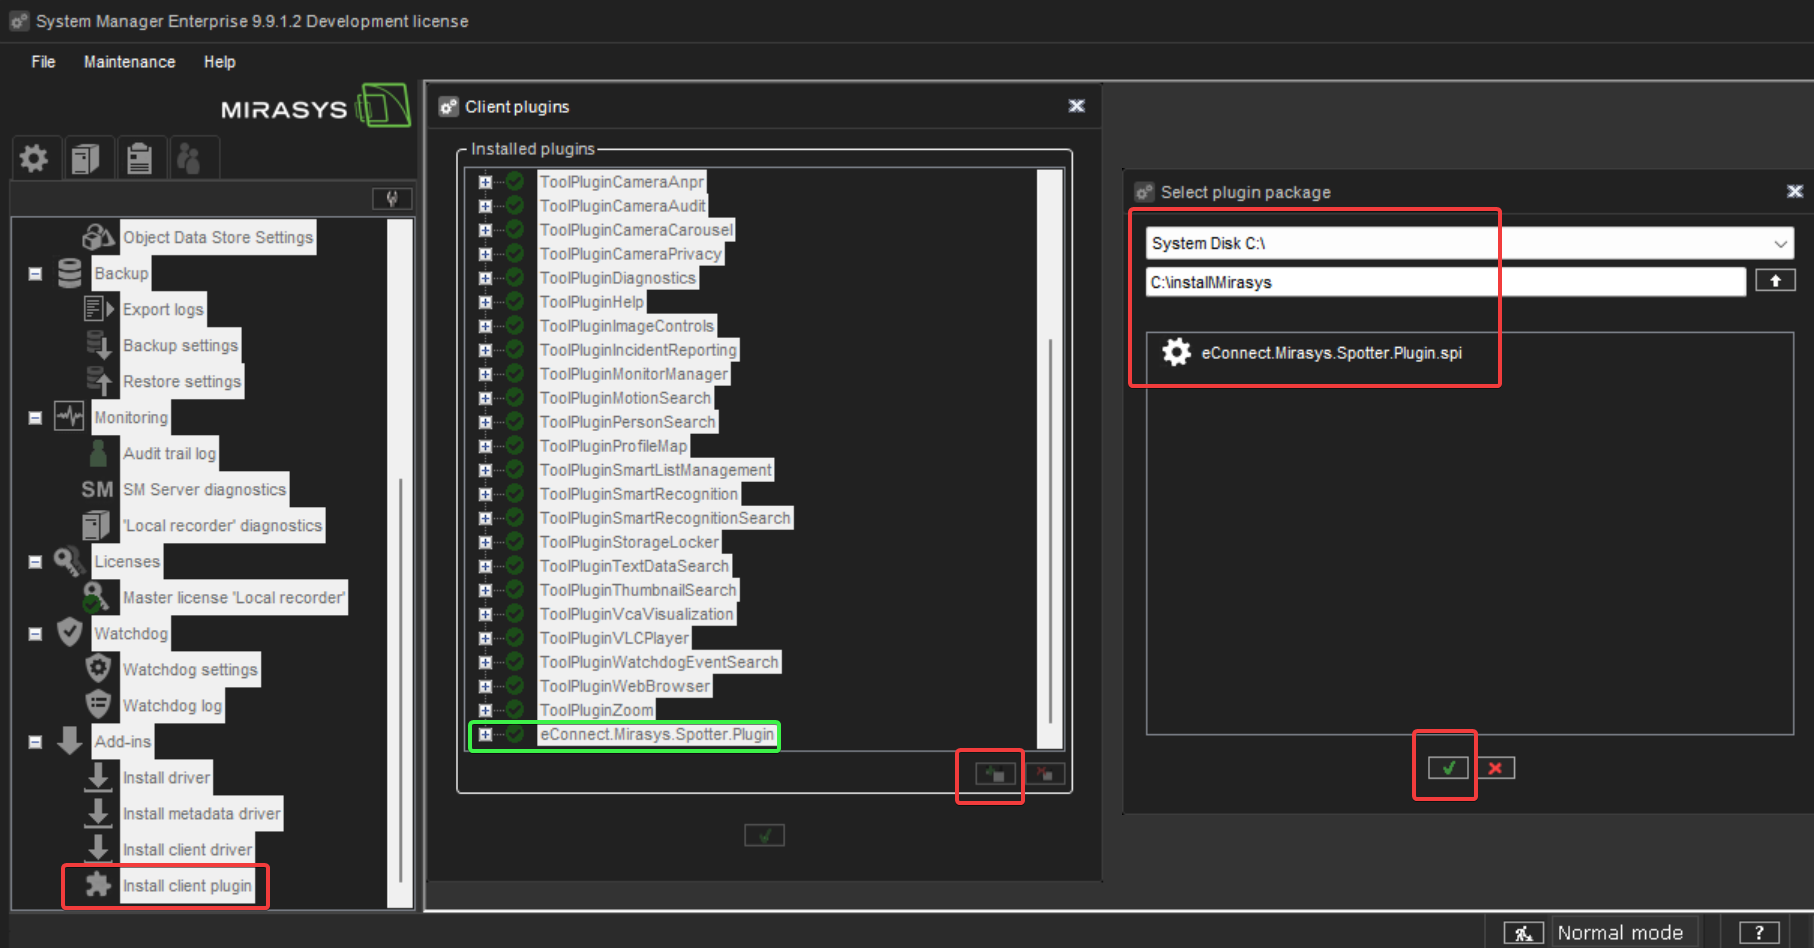
Access Add-ins:
- In System Manager, navigate to "Add-ins"
- Select "Install Client Plugin"
-
Install Plugin File:
- Click the "Add" button
- Browse and select the "eConnect.Mirasys.Spotter.Plugin.spi" file
- This will import the eConnect plugin into the Mirasys application
-
Verify Installation:
- Confirm the plugin appears in the available add-ins list
- The eConnect plugin should now be available for profile configuration
Step 3: Open System Manager Application
- If not already open, launch the Mirasys System Manager Application.
- Log in with administrative credentials.
Step 4: Access Profile Configuration
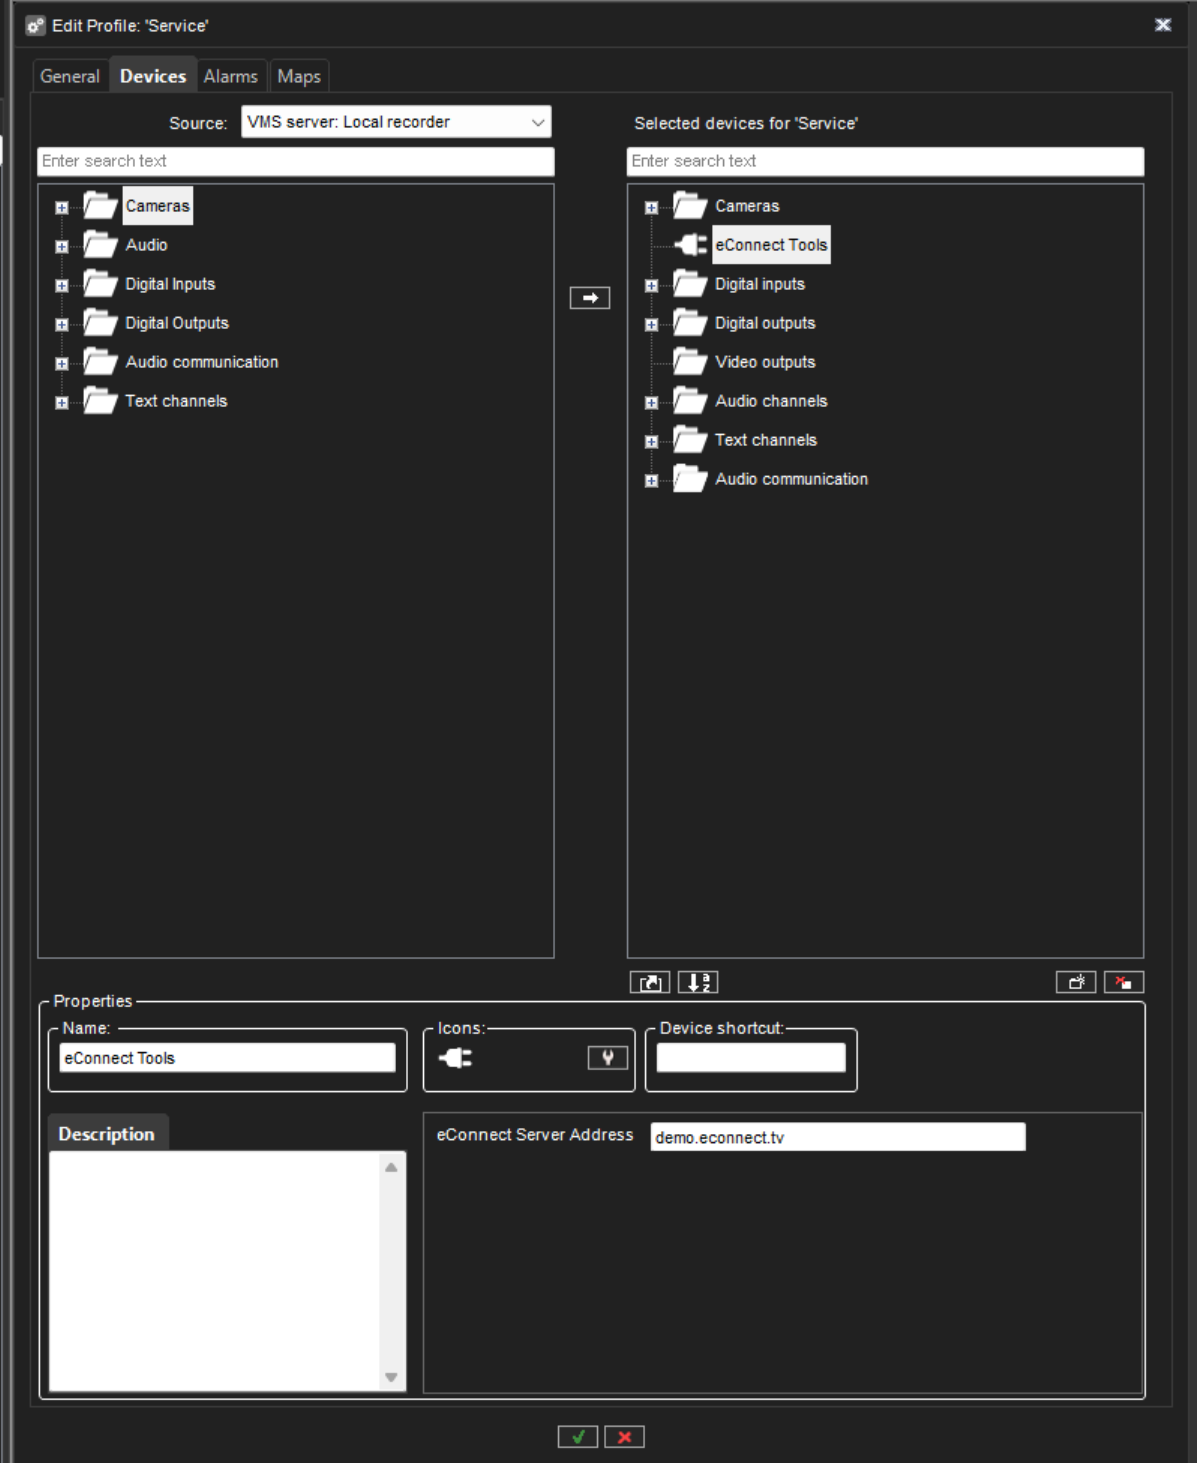
- Navigate to the Profile you want the eConnect plugin to be available for.
- This could be your main operational profile or a specific user group profile.
Step 5: Add Plugin to Service Profile Tree
- In the Service Profile Tree, locate the plugins section.
- Add the eConnect Plugin to the Service Profile Tree.
- The plugin should now appear in the available services for this profile.
Step 6: Configure eConnect Server Address
- Select the newly added eConnect plugin in the Service Profile Tree.
- In the configuration panel, locate the Server Address field.
- Enter the eConnect Server Address:
- Use the hostname or IP address only
- Do not include
http://orhttps://prefixes - Example:
econnect.yourcompany.comor192.168.1.100
Step 7: Save Configuration
- Save the profile configuration.
- The eConnect plugin is now configured and ready for use.
- Users assigned to this profile will have access to eConnect features.
Verification
To verify the configuration is successful:
- Log into the Mirasys client with a user assigned to the configured profile.
- Check that the eConnect icon appears in the profile menu.
Troubleshooting
License import issues:
- Verify you have administrative privileges in System Manager
- Ensure the license file is valid and obtained from Mirasys
- Contact Mirasys support if the license doesn't contain the eConnect Spotter Connector
Plugin installation issues:
- Verify the eConnect.Mirasys.Spotter.Plugin.spi file is not corrupted
- Ensure you have administrative privileges to install add-ins
- Check that the Mirasys license includes the eConnect Spotter Connector before installing the plugin
Plugin not appearing in Service Profile Tree:
- Verify the eConnect plugin is properly installed in Add-ins
- Check that you have administrative privileges
- Restart the System Manager Application if necessary
- Ensure the license was properly imported before installing the plugin
Cannot connect to eConnect server:
- Verify the server address is correct (no http/https prefixes)
- Check network connectivity between Mirasys and eConnect server
- Ensure firewall rules allow communication on required ports
Users cannot see eConnect features:
- Verify users are assigned to the correct profile
- Check that the profile configuration was saved properly
- Users may need to log out and back in to see new features